You’ll master stovetop grilling by starting with quality, evenly-pounded chicken breasts or thighs. Pat them dry, season generously, and marinate for ideal flavor absorption. Preheat your grill pan gradually to medium-high, then sear for 2-3 minutes per side until you achieve a golden crust. Use an instant-read thermometer to verify doneness at 155°F, allowing carryover cooking to reach the safe 165°F. Rest your chicken for 5-10 minutes before serving. The techniques behind restaurant-quality results deserve deeper exploration.
Selecting and Preparing Your Chicken
The foundation of perfectly grilled stovetop chicken starts with choosing the right cut and preparing it properly. You’ll want boneless, skinless chicken breasts or thighs—each 8-10 ounces—since they cook evenly on a grill pan. Thighs offer superior juiciness and nutrition, while breasts provide leaner protein.
Before cooking, butterfly thicker breasts to 1-2 inches, then flatten them to an even 3/4-1 inch thickness. This guarantees consistent cooking throughout. Pat your chicken completely dry with paper towels; moisture prevents proper searing and browning. Season your chicken with garlic powder, onion powder, salt, and ground pepper to enhance the natural flavors before it hits the pan. For best results, prioritize quality, organic, free-range chicken that will elevate the overall taste and texture of your dish. Consider brining the chicken beforehand to enhance tenderness and moisture retention during cooking.
For ideal chicken storage, keep your selection refrigerated until you’re ready to cook. Once dried and seasoned, let it sit at room temperature for 45-60 minutes. This allows even cooking from edge to center, delivering exemplary results on your stovetop grill pan. Chicken is packed with essential vitamins and minerals including niacin, B6, B12, selenium, and phosphorus that support your overall health. Always use a meat thermometer to ensure your chicken reaches an internal temperature of 165°F for food safety and optimal juiciness.

Meets standards for animal welfare, feed, and more, so you can know about what you're buying (and eating)

Meets standards for animal welfare, feed, and more, so you can know about what you're buying (and eating)

Meets standards for animal welfare, feed, and more, so you can know about what you're buying (and eating)
Essential Equipment for Stovetop Grilling
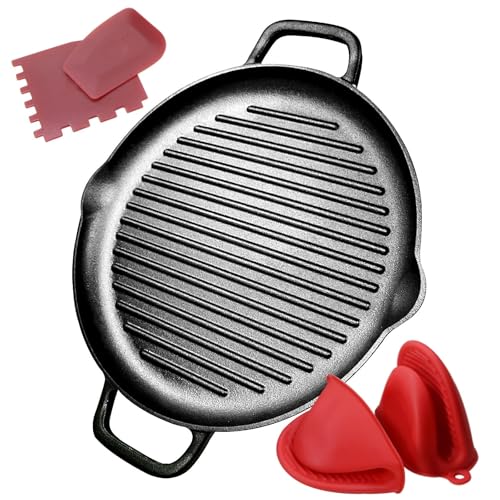
Setting up the right tools makes all the difference when you’re grilling chicken indoors. You’ll need a 10-12 inch cast iron or enameled grill pan that distributes heat evenly across your stovetop. Invest in long-handled stainless steel tongs with a locked mechanism for compact storage solutions and firm grip control. A wide, flexible spatula prevents skin breakage during flipping.
For accurate doneness, use an instant-read thermometer to verify your chicken reaches 165°F internally. Keep heat-resistant silicone-tipped tongs nearby to avoid scratching your pan’s surface.
Prioritize pan maintenance by pre-seasoning cast iron for longevity and non-stick performance. After cooking, employ a heat-resistant double-helix brush to remove residue from grill ridges effectively. Replace brushes annually to prevent bristle contamination and guarantee optimal cleaning performance. The Lodge Chef Collection features tall ridges that create defined grill marks on chicken while ensuring even heat distribution across the cooking surface. For even better results, explore precision-engineered grill tools that complement your stovetop setup. Consider pairing your stovetop setup with long-handled utensils designed specifically for safe and comfortable handling of hot cookware. If using a traditional wire brush, inspect your grill pan surface afterward to ensure no stray bristles remain that could contaminate your next meal. Cast iron’s legendary heat retention allows you to achieve restaurant-quality searing on chicken breasts and thighs right on your stovetop. Before you begin grilling, verify your stove compatibility to ensure your chosen grill pan works efficiently with gas, electric, or induction cooktops. If you prefer a flat cooking surface without ridges, a stovetop griddle offers versatility for chicken cutlets and other proteins while maintaining excellent heat distribution.

Versatile Cooking Skillet: The Lodge Cast Iron Skillet is a multipurpose, everyday cooking pan that excels at searing, sautéing, baking, frying, and campfire meals

Quality Cast Iron Frying Pan: The Lodge Seasoned Cast Iron Skillet is loved for its great heat retention, incredible durability, and ability to make almost any recipe you dream up

HEAVY-DUTY CAST IRON – Built from durable cast iron for long-lasting performance, this skillet is made to handle everyday cooking and years of use in your kitchen, at the campsite, or on the grill.
Crafting the Perfect Seasoning Blend
While your grill pan heats, you’ll want to prepare a seasoning blend that’ll complement your chicken’s natural flavors and create an appealing crust. Start by combining paprika, garlic powder, onion powder, and salt as your foundation—these create a savory base that works across any style. Layer complementary flavors by adding black pepper, cumin, and smoked paprika for depth and subtle smokiness. Balance spice levels by incorporating chili powder or cayenne pepper cautiously; start with ½ teaspoon and adjust upward. For Mediterranean profiles, include oregano or thyme. Mix your spices thoroughly in a small bowl before applying. Use approximately 1 tablespoon per pound of chicken, rubbing evenly on both sides. Allow 15 minutes to 4 hours for flavors to meld before cooking. Ground thyme adds an earthy note that pairs exceptionally well with the paprika and cumin base for a well-rounded spice profile. For a sweet-and-spicy variation, incorporate a pinch of brown sugar to balance the heat from your chili powder or cayenne. If you’re seeking even more smokiness, consider adding hickory wood chips to an outdoor grill for that bacon-like flavor that pairs beautifully with chicken. For those using pellet smokers, 100% natural hardwoods like hickory, cherry, or apple from brands such as Lumberjack or CookinPellets deliver clean-burning performance and bold smoky flavor without fillers or additives. When transitioning to outdoor grilling, lump charcoal delivers high heat perfect for searing chicken while imparting natural flavor without chemical additives. Store any unused seasoning blend in an airtight container for convenient use on future meals. Once your chicken is perfectly grilled, consider pairing it with classic baked beans or a quick pasta salad to create a complete and satisfying meal.

FLAVORFUL BLEND: McCormick Grill Mates Montreal Chicken Seasoning offers vibrant flavors for exceptional recipes with an unmatched, made-from-scratch taste; robust with a kick of spice
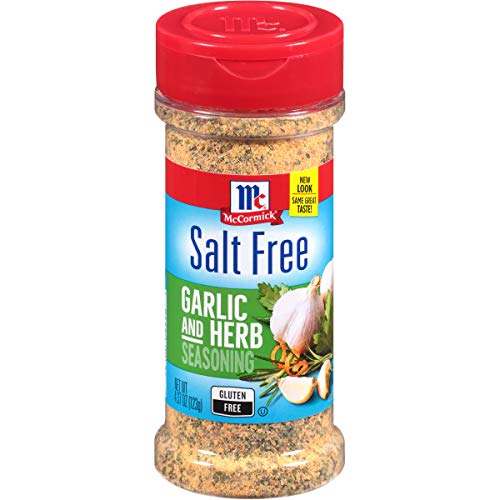
McCormick Salt Free Garlic and Herb Seasoning has no salt or MSG added

GARLICKY & HERBY: McCormick Grill Mates Roasted Garlic & Herb Seasoning lends craveable, roasted garlic and herbs flavor for whatever’s on your grill.
Marinating and Bringing Chicken to Room Temperature
Now that you’ve seasoned your chicken, it’s time to marinate it for maximum flavor development. Start by piercing your breasts with a fork to enhance absorption of ideal marinade ingredients like olive oil, garlic, vinegar, and thyme. Place your chicken in an airtight container and turn it several times to guarantee even coating.
Marinate at room temperature for 30 minutes, then refrigerate up to 24 hours for deeper flavor penetration. Your chicken storage options include refrigeration for two days or freezing marinated portions up to one month in airtight bags. For best results, use kosher salt or coarse salt in your marinade rather than table salt for superior flavor distribution. You can freeze marinated chicken for up to 6 months when stored in airtight bags.
Before cooking, remove your chicken from the refrigerator 15-30 minutes ahead of time. Pat it dry thoroughly to eliminate excess moisture, ensuring a perfect golden sear on your stovetop.

Dual Sealing: Our brining bags for turkey are the effective solution with two tight zippers and one bundle of robust string. With such dual protection, you can avoid the kitchen marinade mess from expanding outwards and spilling. Therefore, no more worries about cleaning the refrigerator and enjoy your turkey day

Food-Grade Material & Easy to Clean - Lerine’s truly food-grade reusable 3 gallon freezer bags are crafted from BPA-free PEVA material—safe for storing large cuts of meat, vegetables, clothes, and other household essentials. These oversized bags are easy to clean by hand and are also dishwasher-safe (top rack only). For best results and to help maintain their shape, hand washing is recommended due to their large size.

Thanksgiving turkey brine kit contains: 3 brine bags for turkey and 3 ropes. marinade bags the size is: 26inx24in, which can hold 35lb of turkey and salt water. The oversized turkey pickling bag allows you to pickle large pieces of meat at ease, making parties and dinners more convenient, which is essential for families.
Pounding for Even Thickness
To guarantee your chicken cooks evenly on the stovetop, you’ll want to pound your breasts to a consistent ½-inch thickness. Start by slicing each breast horizontally, then place it in a 1-gallon zip-lock bag. Using a meat mallet, strike the chicken with flat, direct blows—avoiding thinner regions by focusing initial strikes on the thicker fat side. If you don’t have a mallet, a rolling pin works as an alternative mallet option. Pound until you’ve achieved uniform thickness throughout, which prevents the thin tail end from overcooking while ensuring the fat side cooks sufficiently. Pat the pounded breasts dry, season them ahead, and let them sit for 30 minutes. Pounding ensures even cooking by creating a consistent surface that cooks at the same rate. Patting the meat dry is crucial for achieving a crispy sear when it hits the hot pan. For optimal flavor development, consider preparing a lemon and cilantro marinade while your chicken rests. Brush both sides with olive oil before proceeding to your medium-high heat grill pan. Once your chicken is on the heat, ensure the internal temperature reaches 165°F (74°C) for safe consumption. You can brush your chicken with your preferred sauce during the last minute or two of cooking to enhance the flavor. Similar to how salting and draining eggplant removes excess moisture before grilling, ensuring your chicken is properly dried helps achieve better texture and prevents steaming. After cooking, remember to perform routine light cleaning of your grill pan grates to maintain performance and prevent flavor transfer to future meals.
Preheating Your Grill Pan Correctly
Once you’ve prepared your chicken and it’s ready to cook, your grill pan’s preheating becomes the foundation for success. Start on low heat for 3-5 minutes to allow even heat penetration, then gradually increase to medium-high. This proper heat level prevents hot spots and guarantees uniform cooking.
A consistent preheating process takes 5-8 minutes total. You’ll know your pan’s ready when a water droplet sizzles and evaporates immediately, or when bread placed in the cold pan turns golden as it heats. For cast iron, apply a thin vegetable oil layer on the ridges during medium heat—this polymerizes into a non-stick surface. Proper preheating and seasoning enhance the pan’s cooking performance and lifespan. The oil spread thinly and evenly across the hot pan surface creates an even nonstick layer that improves your cooking results. After the oil begins to smoke, allow it to bond to the surface for optimal results. To maintain this protective layer, consider re-seasoning your cast iron grill pan every few months or after deep cleaning.
Avoid applying oil directly to your pan once food’s added; instead, oil your chicken beforehand. This maintains steady temperature and promotes the Maillard reaction for those coveted sear marks. Choose oils with high smoke points like refined avocado, peanut, or canola oil, which can withstand grilling temperatures without burning. If you’re grilling outdoors, consider placing a heat-resistant mat beneath your grill to protect your deck surface from grease and potential damage. You can apply the oil using several application methods, including wiping with a paper towel, spraying, or brushing it onto the grates.

Fabric Type: Rubber
🍳PREMIUM QUALITY GRILL PAN&SiZE: Package include 12.6" Inch griddle Pan, 2 piece Grill Pan Scrapers, 2 piece silicone handles. Our griddle pan with easy grease drain spout and large easy-grip handles.High ribbed ridges keep ingredients out of fat and spouts on two sides can for drip-free pouring out of fat oil, reduce fat intake.Large easy-grip handles convenient to transport and move.

VERSATILE COOKING: Reversible griddle with flat and ridged sides for grilling meats or cooking pancakes. Perfect for stove tops and ovens, fitting over two burners.
Searing and Flipping Techniques
Three critical elements determine whether you’ll achieve perfectly seared chicken with impressive grill marks: proper heat management, correct placement, and strategic flipping.
Place your prepared chicken on the preheated pan immediately, avoiding overcrowding to guarantee even heat contact. Use tongs to flip after your initial cooking time—typically 2-3 minutes on medium heat or 6 minutes on high, depending on thickness. Boneless chicken thighs are particularly effective for stovetop cooking because they cook quickly and provide excellent caramelization on the pan’s surface.
Your timing adjustments matter greatly. After flipping, cook the second side for 2-3 minutes on medium heat, checking for moisture retention. For thicker breasts, extend to 5-8 minutes per side while maintaining consistent heat. Use a meat thermometer to verify the internal temperature reaches 165°F for food safety. Consider using a leave-in thermometer for continuous monitoring to ensure your chicken reaches the perfect doneness without overcooking.
Apply searing techniques strategically: brush on glazes immediately after the final flip, then rest your chicken 2-5 minutes off heat. Letting the meat rest for several minutes before serving helps retain juiciness and allows the proteins to relax. Wrapping your chicken in foil during the resting period helps the connective tissue break down, resulting in more tender and flavorful meat. This approach locks in juices while developing that desirable crust. If you need to reheat your grilled chicken later, use low to medium heat with a small amount of water and cover the pan to maintain moisture.
Checking for Doneness and Internal Temperature
You’ll want to rely primarily on an instant-read thermometer rather than visual cues alone, since color can be misleading due to carryover cooking. Insert the thermometer into the thickest part of the breast, avoiding bone contact, and target 155°F for removal. The residual heat will raise your chicken 5–7°F during resting, reaching the safe 165°F threshold.
Pair continuous temperature monitoring with visual doneness signs for confidence. Look for firm texture, clear juices when pierced, and skin that pulls away easily from the meat. These indicators confirm your chicken’s safety without relying solely on appearance. Using a Thermapen ensures you’re measuring the lowest temperature in the meat for accurate doneness assessment. For stovetop cooking, use meat probes to monitor internal temperature throughout the cooking process.
Budget-friendly options like the ThermoPro TP20 offer dual probes and reliable accuracy for monitoring multiple pieces simultaneously. For more advanced monitoring, consider models with separate ambient probes that provide accurate grate-level temperature readings throughout your cook. The ThermoWorks Thermopop 2 delivers professional-grade reliability at a price point suitable for most home cooks. After cooking, wipe down your grill pan with mild soap to remove any grease buildup and maintain its performance. Always use plastic or wooden utensils when handling your chicken to avoid scratching the non-stick surface of your grill pan. Tent your chicken with foil immediately after removing it from heat, allowing one minute minimum for temperature equalization. This approach guarantees both food safety and exceptional juiciness.
Resting and Serving Your Grilled Chicken
After removing your chicken from heat at 155°F, tent it loosely with foil to trap residual warmth while allowing slight steam escape. This resting period, typically 5-10 minutes, enables carryover cooking to equalize thermal gradients while juices redistribute throughout the meat, maximizing moisture retention.
During resting, you’ll observe a 5-7°F temperature rise, bringing your chicken to ideal doneness without overdrying it. Resist the urge to slice immediately—this locks in juices and prevents moisture loss. Using a smart meat thermometer during this phase ensures you achieve the perfect internal temperature without guesswork. For precision monitoring throughout the cooking process, consider wireless probe thermometers that allow hands-free temperature tracking via smartphone apps. Allowing your chicken to rest tented with foil helps the juices redistribute before slicing and serving.
Once rested, serve your chicken whole or sliced. Pair it with grilled vegetables or crisp salads, or use sliced portions for sandwiches. A light sprinkle of salt and pepper enhances flavor. For optimal results, consider pairing your chicken with complementary side dishes that balance the smoky flavors from stovetop grilling. For additional flavor, you can add fresh herbs like rosemary during the resting period to infuse aromatic notes into the meat. If you want to enhance the smoky flavor in future preparations, consider using natural hardwood pellets in a smoker box on your grill. Store leftovers covered in the refrigerator for 3-4 days, ensuring you’ve completed the full resting period before refrigerating. When ready to enjoy your leftovers, reheat them to at least 165°F before consumption to ensure food safety.