You’ll smoke your chicken wings for approximately 30 minutes at 250-275°F to render fat and absorb smoke flavor. Then transfer them to a high-heat finishing method at 350-375°F for another 5-9 minutes, flipping halfway through. This two-stage approach creates tender, smoky meat with crispy, golden skin. Use a probe thermometer to confirm wings reach 175°F internally for ideal texture. The techniques that’ll truly elevate your results extend well beyond these basics.
Low Temperature Smoking Basics
The foundation of perfectly smoked chicken wings starts with maintaining a consistent temperature between 250-275°F, which you’ll want to establish right from the beginning of your smoking session. This lower temperature range enables ideal smoke circulation patterns around each wing piece, ensuring even flavor penetration throughout your batch.
You’ll find that 250°F specifically initiates the smoking process before you increase the heat. During this phase, the fat rendering process begins, breaking down connective tissue while allowing smoke to envelop each wing thoroughly. Consistent temperature maintenance proves essential—fluctuations compromise both cooking evenness and the quality of your final product’s texture. Using a probe thermometer will help you monitor the internal temperature and ensure your wings reach the proper doneness. Pat down your wings with paper towels to remove all surface moisture before seasoning, as this step is critical for achieving crispy skin. For precise monitoring during longer smoking sessions, consider investing in a dual probe thermometer that can track both meat and ambient grill temperatures simultaneously. Some pitmasters recommend air-drying the chicken uncovered in the fridge overnight before smoking to enhance skin texture and improve smoke adhesion. Serious pitmasters often rely on instant-read thermometers with 1-second read times to quickly check wing doneness without losing heat from the smoker. Wireless meat thermometers with app connectivity offer hands-off precision for tracking both internal meat temperature and smoker ambient conditions throughout your cook. After smoking, resting the chicken for 5 to 10 minutes helps redistribute the juices for best texture and flavor.
Your initial smoking duration should last approximately 30 minutes at this temperature range, providing sufficient time for proper fat rendering and smoke absorption before advancing to higher heat stages.

【Easier to Use】Equipped with 2 meat probes, this BBQ thermometer for grill allows you to monitor separate meats or the grill temperature simultaneously, a real comfort in grilling several pork loins for large groups with different tastes

Bluetooth Monitor Remotely: Govee Bluetooth meat thermometer lets you check the temperature of your grill, smoker, or oven from your phone. With this smart BBQ thermometer, you can multitask while grilling.

BBQ High/Low Temperature Alarm: This smoker thermometer will flash and beep to notify you if your grill's temperature ever exceeds your desired range, and when to add more fuel. HI/LOW temp range alarm is specifically designed for usage with smokers, grills and BBQs
High Temperature Finishing Techniques
Once you’ve completed the low-temperature smoking phase, you’ll want to transfer your wings to a high-heat finishing method that transforms their exterior into a crispy, flavorful shell while preserving the juicy, smoke-infused meat inside.
Your oven finishing parameters should include preheating to 350-375°F on sheet pans lined with foil. This temperature control consideration guarantees against overcooking while effectively removing surface moisture. Place wings skin-side up and finish for 5-6 minutes per side, flipping halfway through for uniform crispness. For optimal results, you can also broil wings in the oven for 7-9 minutes with the fatty side facing up toward the heat source.
For enhanced results, brush your wings with glaze or sauce before oven placement. This technique ascertains even heat distribution across all surfaces, delivering consistent browning without additional equipment. However, for truly crispy smoked chicken wings, deep-frying the wings after smoking is the most effective method to achieve the desired texture. The high-heat environment renders remaining fat, creating that desirable crispy texture you’re pursuing. Some pitmasters even use the ice cube technique by placing a small frozen cube of broth or butter near the wings during the final minutes to add moisture and prevent dryness. Alternatively, you can finish wings on a grill set to 350°F to 425°F for 20 to 30 minutes, flipping frequently every 3 to 5 minutes to ensure even cooking and crispy skin. Look for grills with durable grates that can withstand high heat and provide consistent searing across the entire cooking surface. To ensure food safety, always use a meat thermometer to verify wings have reached the proper internal temperature before serving. Using indirect heat during the finishing phase can help prevent flare-ups while still achieving crispy skin, especially when dealing with the rendered fat from smoked wings.
Great for making a variety of delicious treats like bacon, jerky, dried fruits, crisp fries, veggies and more

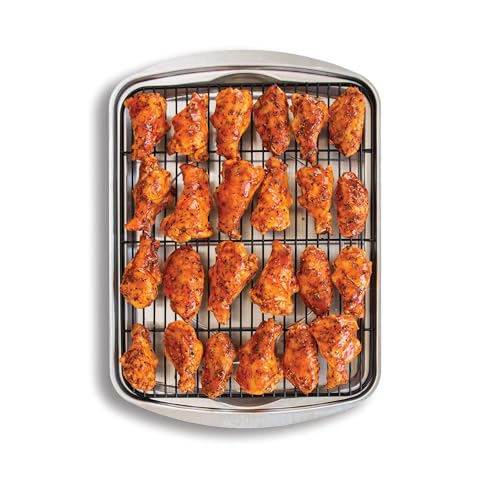
CRISPY BAKING SHEET SET: Ensure crisp results every time in the oven. This 15” x 10.5” nonstick baking pan and wire rack is great for crisping bacon, chicken, wings, fries, chips, and much more.
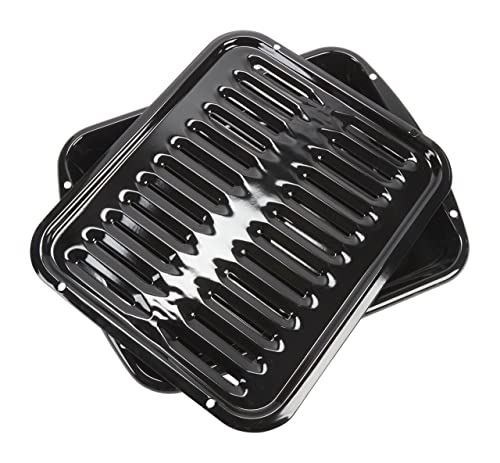
GENUINE OEM QUALITY: Whirlpool Genuine OEM broiler pan is designed for compatible ranges and ovens to help support proper fit, dependable performance, and the quality standards your appliance was built for
Understanding Safe Internal Temperatures
Now that you’ve achieved that perfect crispy exterior, you’ll want to verify your wings have reached a safe internal temperature throughout. The USDA’s minimum internal temperature for chicken is 165°F (74°C), which effectively kills pathogens like Salmonella. However, for wings specifically, you’ll benefit from pushing to 175°F to break down connective tissue and achieve fall-off-the-bone tenderness.
Use reliable temperature monitoring tools like a Thermapen ONE or leave-in probe thermometer to confirm doneness accurately. Insert your thermometer into the thickest part of the largest wings on opposite smoker sides. Check multiple wings before removing them to ensure uniform cooking across your batch. Using a meat thermometer is crucial to ensure proper doneness without overcooking your chicken wings. Whether you’re smoking wings or a whole bird, maintaining proper smoking temperature and monitoring internal doneness are critical for both safety and optimal results. Continuing to cook beyond the minimum safe temperature allows the connective tissues to break down, resulting in exceptionally tender meat. This precision guarantees both food safety and ideal texture every time.
Essential Wing Preparation Methods
Three critical preparation steps will determine whether you’ll achieve perfectly crispy, flavorful smoked wings or mediocre results: moisture removal, seasoning application, and proper portioning.
Start by patting wings thoroughly with paper towels—moisture prevents browning and crispness. Your air drying techniques should involve placing wings on wire racks for 15-30 minutes, allowing circulation that enhances skin texture. For even crispier results, incorporate baking powder into your seasoning mixture, which chemically reacts during cooking to create superior crunchiness.
Next, apply uniform seasoning application using salt, pepper, garlic powder, paprika, and baking powder. Toss wings evenly to coat all surfaces, then rest them 30 minutes or refrigerate overnight for deeper flavor penetration. Consider using dry rubs for bold flavor without the mess of wet marinades. Modern pellet smokers with WiFi allow you to monitor temperature remotely via smartphone apps while your wings cook, ensuring consistent results without constant checking. If using a pellet grill, fill the hopper with hardwood pellets before starting to ensure continuous fuel supply throughout the smoking process.
Finally, portion wings at the joints, separating flats from drumettes. Remove tips carefully using kitchen shears or a chef’s knife. This portioning increases marinade absorption and reduces cooking time considerably. To maintain even spacing during smoking and improve heat circulation, consider using an upright rack designed for poultry that keeps each piece separated for crisper skin. After smoking, clean your grill grates with a nylon-bristle brush on cool surfaces to avoid melting the bristles while safely removing residue. For gas grill users who want to protect their cooking surface from grease and simplify cleanup, grill mats with heat resistance up to 500-600°F can prevent flare-ups while still allowing excellent flavor development.

THE PERFECT FATHER’S DAY GIFT FOR FOOD & BBQ LOVERS – Looking for Father’s Day gift ideas for dad, Father’s Day gifts for husband, or unique BBQ gifts for men? This zesty Lemon Pepper Wing Dust delivers bright citrus flavor and bold peppery kick that every grill master and snack lover will enjoy.
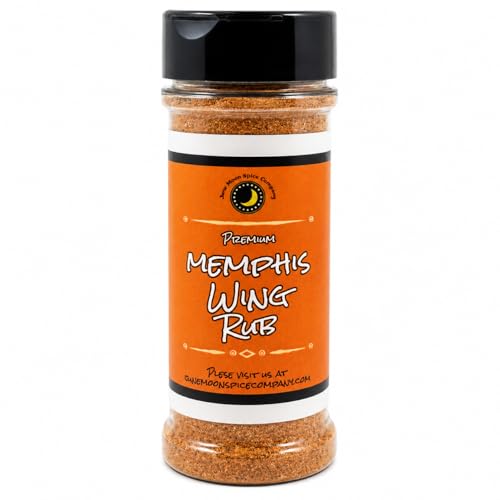
Bold Memphis Wing Rub - A smoky, savory dry rub seasoning made to bring big Memphis-style flavor to chicken wings, drumsticks, grilled chicken, BBQ, and game day snacks.

THE PERFECT FATHER’S DAY GIFT FOR SPICY FOOD LOVERS – Looking for Father’s Day gift ideas for dad, Father’s Day gifts for husband, or unique BBQ gifts for men? This Buffalo Wing Dust delivers the bold, tangy heat wing lovers crave in a convenient, mess-free seasoning.
Total Cooking Time Guidelines
Your properly prepared wings are now ready for the smoker, and understanding cooking temperatures and timing will make the difference between wings that’re succulent and tender versus those that’re dry or undercooked.
The ideal cooking duration depends on your chosen method. For the quick smoke approach, you’ll reach perfection in 45 minutes to 1 hour using a two-stage temperature shift. The extended low-and-slow method requires 3.5 to 4 hours at a consistent perfect temperature range of 225°F, yielding superior texture and juiciness. For smoking at 225°F, plan for approximately 90 minutes until the internal temperature reaches 160F, flipping the wings halfway through for even cooking.
The two-phase finishing technique falls between these approaches, taking 1.5 to 2 hours total. Regardless of your method, target an internal temperature of 175°F to 180°F for optimal tenderness and complete fat rendering. Size variations affect timing—larger wings need additional minutes beyond standard estimates. Monitoring internal temperature with a meat thermometer is recommended to ensure wings reach the safe minimum of 165°F throughout. The low-and-slow method helps keep the chicken moist by allowing fat and connective tissues to break down slowly during the extended cook time. Resting the meat after smoking allows carryover cooking to finish the process without drying out the wings. Some pitmasters prefer increasing the heat after the initial smoking phase to achieve crispier skin while maintaining juicy meat. Using an instant-read thermometer provides the most precise measurement of doneness throughout the cooking process. Start checking the temperature around the 30 to 45-minute mark when using higher heat methods to avoid overcooking.
Achieving Perfectly Crispy Skin
How do you transform smoked chicken wings from tender to absolutely craveable? You’ll apply baking powder 12–24 hours before cooking—it raises skin pH, allowing proteins to break down efficiently while removing moisture. Pat your wings dry thoroughly; this moisture absorption impact proves critical for crispness.
Next, employ a two-stage temperature approach. Start at 250°F for 30 minutes to render initial fat and absorb smoke. Then increase to 375–425°F to rapidly crisp the exterior. Consider butter basting at the 35-minute mark with clarified butter—the hot oil enhances skin texture development tremendously. Cooking at 450-475°F on a pellet grill with a wire rack ensures optimal fat rendering and skin crispiness.
For ultimate crispiness, finish with a 3-minute deep fry at 375°F after a 10-minute rest. Air drying your wings before smoking can also enhance skin crispness by allowing surface moisture to evaporate completely. Apply your chosen seasoning both under and over the skin to maximize flavor penetration, using a generous BBQ rub to create a flavorful crust during the smoking process. After cooking, always let your smoker cool completely before covering to prevent moisture and mildew buildup that can damage both your equipment and protective cover. Similar to achieving distinct grill marks on pineapple, these skin tenderizing approaches combined create wings with exceptional texture and flavor. Choose apple, cherry or maple wood when smoking to impart your desired smoke flavor throughout the cooking process. When selecting wood chips, consider pairing options like apple or hickory that complement poultry just as they enhance other smoked dishes.

Gluten Free, Vegan, Vegetarian, Kosher, Halal

Our Baking Powder Makes The Lightest, Fluffiest Cakes, Quick Breads And Baked Goods

One 8.1 ounce can of Double Acting Baking Powder
Wood Selection and Smoking Temperatures
Selecting the right wood fundamentally transforms your smoked chicken wings from merely edible to genuinely exceptional. You’ll want to match your smoke flavor intensity to your preferences. Oak delivers the goldilocks balance—subtle enough to let chicken shine through without overpowering it. Hickory offers bold, robust notes at 245°F, while apple provides mild sweetness ideal for gentle infusion. Consider wood blending ratios: combine apple with pecan for enhanced complexity, or pair cherry with pecan for nuanced depth. Most pitmasters prefer using one handful of chips to achieve a short, intense blast of smoke that lasts just long enough to give wings a nice flavor without overwhelming them.
Temperature control matters equally. Maintain 245°F for hickory or pecan-based smokes to maximize flavor absorption during your cook. This low-temperature approach suits slow-burning woods perfectly, allowing sustained smoke penetration. Ensure the wood is completely dry when adding it to the coals, smoker box, or foil packet for cleaner smoke and better results. Always avoid softwoods like pine, which leave bitter residue that ruins the delicate flavor of chicken wings. Hickory lends a sweet, bacon-like note that works especially well for chicken wings. Cherry wood produces a mild, fruity smoke that pairs exceptionally well with poultry and adds an attractive mahogany color to your wings. For optimal smoke development, source high-quality, fresh chips from trusted retailers to avoid mold or pests that can compromise your cook. Look for kiln-dried, MDA-certified hickory to ensure you’re getting wood free from contaminants that could negatively affect your wings’ flavor. You’ll achieve consistently superior results by matching wood selection with appropriate temperatures, creating wings with ideal smoke character and tenderness.


PREMIUM WOOD CHIPS: Made from all-natural wood that burns cleanly and evenly, these wood chips can be used on top of charcoal and in smoker boxes to deliver professional-level, mouth-watering results.

Single-Stage Versus Multi-Stage Cooking
When you’re deciding between smoking methods, the choice fundamentally shapes your final result’s texture, flavor depth, and preparation time. Single-stage smoking at 225°F delivers golden skin in 1-2.5 hours, ideal for smaller wings reaching doneness quickly. Multi-stage cooking offers superior flavor management by smoking at low temperature first, then finishing hot for crispy exteriors. This approach penetrates smoke better into raw meat while rendering fat efficiently. You’ll achieve tenderness without rubbery texture by combining the two stages. Multi-stage methods enhance cooking efficiency for larger batches, avoiding extended low smokes while delivering professional results. Similar to smoking larger cuts, monitoring internal temperature with a meat thermometer ensures your wings reach the safe doneness zone without overcooking. For enhanced flavor, consider using wood pellets such as apple, cherry, hickory, or mesquite during the smoking stage. The wrapping technique used for ribs can also be adapted for wings during the second stage to retain moisture and accelerate cooking. Choose single-stage for simplicity and speed, multi-stage for refined taste and texture complexity.
Doneness Indicators Without a Thermometer
Once you’ve committed to your smoking method—whether single-stage speed or multi-stage refinement—you’ll need reliable ways to confirm your wings have reached safe doneness without relying on a thermometer.
Start by observing color: golden, lightly crisp edges and light brown surfaces indicate proper cooking. Slice the thickest wing section; you’ll see uniformly white meat with no pink hues. Pierce a wing and check for clear exuded juices—translucent run-off confirms doneness.
Tactile texture cues matter equally. The meat should pull easily from bone without resistance. Press gently; properly cooked wings spring back slightly and feel firm throughout without rubbery texture. Some cooks like to spray the wings with apple cider vinegar during the smoking process to help keep the meat moist and add flavor. When golden exteriors align with white interiors and clear juices flow freely, your wings have reached safe, perfectly smoked completion. For any poultry, including wings, the safe minimum internal temperature reaches 165°F, though a thermometer provides the most accurate confirmation when available. Smoking at lower temperatures helps reduce the formation of harmful compounds compared to high-heat cooking methods. Flip the wings halfway through the smoking process to ensure even cooking on both sides. Letting the meat rest for 5 to 10 minutes before serving helps retain juiciness and allows the flavors to settle.