You’ll deep clean your grill by soaking grates in a mixture of two cups white vinegar and one cup baking soda for 8-12 hours. Remove and clean burners separately, clearing gas ports with a thin wire. Spray the interior with the vinegar-baking soda solution, then scrub with a paste made from baking soda, water, and dish detergent. Use progressively stiffer brushes on stubborn buildup. Finish by cleaning the drip pan and reassembling components. Uncover the complete step-by-step process to restore your grill to like-new condition.
Safety Precautions and Preparation
Before you tackle grill buildup, you’ll need to establish a safe cleaning environment by cooling your grill completely, clearing your work area, donning protective gear, disassembling removable components, and prepping your cleaning solution. Allow 30-60 minutes post-use for adequate temperature drop, then verify surface temperature below 100°F with a touch test. Disconnect gas tanks and turn off the gas supply before handling any components.
Remove flammable items and debris from surrounding areas, positioning your grill on a stable, level surface. Wear rubber gloves, eye protection, and non-slip shoes. Scrape major food debris using a spatula or brush, then remove grill grates, burner tubes, and heat deflector plates for separate cleaning. Clear gas ports with thin wire. Protecting the chromium oxide layer by avoiding harsh chemicals will help preserve your grill’s corrosion resistance throughout the cleaning process. For stubborn grime that resists scraping, consider using aluminum foil as a natural scrubbing tool on heated grates before applying your cleaning solution. Prepare your vinegar-water solution in a spray bottle, ensuring you’re ready to begin the deep cleaning process. Having a bucket filled with water nearby will help rinse components and dilute any stubborn residue during your cleaning session. Avoid using harsh chemicals on your grill to prevent contamination of your food and surfaces. Using mild detergents alongside your vinegar and baking soda solution will help tackle stubborn grime without damaging grill components. Regularly removing and cleaning burners and drip pans prevents grease fires and maintains optimal grill performance. Keep kids and pets away from your work area to prevent accidents or injuries while you’re actively cleaning.
Gathering Your Cleaning Tools
Success in deep cleaning your grill depends on assembling the right tools before you begin. You’ll need sturdy, long-handled abrasive brushes designed for removing buildup from grates and interior surfaces. Opt for heat resistant materials like stainless steel construction, which withstands high temperatures and resists corrosion.
Gather grill scrapers with replaceable pads for efficient debris removal. Include silicone brushes with ergonomic handles for applying your vinegar and baking soda solution without shedding bristles. Add heat-resistant claws for maneuvering heavy grates safely. Heat-resistant gloves will protect your hands from sharp edges and hot surfaces during the cleaning process. Popular options like the Weber 6278 18-in Three-Sided Grill Brush offer professional-grade cleaning performance for thorough grate maintenance. While traditional wire-bristle brushes clean effectively, bristle-free alternatives provide safer cleaning with lower risk of stray bristles contaminating your food. Consider triple helix designs that combine superior scraping power with integrated tools for comprehensive grate maintenance.
Prepare a non-porous cutting board as your workspace for organizing components. Stock cooling racks with robust construction to hold grates during soaking. Coiled designs eliminate the safety concerns associated with loose bristles that can end up in your food. For specialized stainless steel grill maintenance, consider using stainless steel cleaner products like those designed to remove exterior build-up and grime while providing a protective finish. For lighting your workspace during nighttime grill maintenance, consider using long reach lighters to safely ignite any workspace lighting you may have set up nearby. Having these specialized tools ready guarantees you’ll work efficiently and thoroughly throughout your deep cleaning process.

DETACHABLE SPACE-SAVING DESIGN: Remove the handle after use and store this space-saving grill brush in drawers, cabinets, grill carts, RV compartments, and toolboxes for transport

PRACTICAL: Wire brushes are ideal for removing paint stains, rust, welding slag,solder,scale, Great for remove corrosion and more from parts, equipment, machinery and other surfaces. Also great for cleaning threads, grills or tile.

Extra Strong Ergonomic Handle - Still believe that as long as the bristles are stiff enough, the grill cleaning brush can live up to the name - a good barbecue brush? Of course not! A soft and sturdy handle with a stainless steel ring for hanging can make the clean work easier. No possibility such as the handle breaking up or snapped. You can succeed in using this BBQ cleaner for a very long time!
Soaking Grates Overnight
Once your grates have cooled completely, you’ll carefully remove them from the grill housing and transport them to a cool, out-of-the-way location like a garage where you’ve laid protective covering on your work surface. Combine 2 cups of white vinegar with 1 cup of baking soda in a large garbage bag immediately before soaking. Expect vigorous foaming—this bubbling action indicates active cleaning agents working to break down grease. Place your grates into the bag, ensuring they’re fully submerged without crowding. Seal the container tightly with rubber bands to prevent leakage and maintain solution storage integrity. Allow 8-12 hours of soaking time for ideal cleaning effectiveness, particularly with heavily soiled grates. The acidic vinegar reacts with alkaline baking soda throughout the entire period, penetrating stubborn buildup and loosening debris. This soaking method works effectively on stainless steel, cast iron, or enamel grill grates without requiring specialized chemical cleaners, and cast iron’s heat retention makes it a popular choice for outdoor grilling despite requiring proper maintenance. Cast iron requires careful maintenance to prevent rust and preserve its seasoned surface. When choosing between materials, consider that specialty panels like GrillGrates offer improved searing and heat distribution as an alternative to traditional grate options. For different camping situations, you may want to select grates based on portability and weight if you frequently move your setup between locations. After soaking, use a grill brush to scrub away loosened debris before rinsing thoroughly. For stainless steel grates specifically, ensure they are completely dry after rinsing to prevent rust formation.
Removing and Cleaning Burners
Your grill’s burners are the heart of its heating system, and they’ll need the same meticulous attention you’ve given to your grates. First, make certain burners are completely cool, then use a ⅜” wrench to detach them carefully. Store screws in a designated location to prevent loss.
Next, inspect gas connections and check burner conditions for clogs or debris. Use an unbent paperclip to clear individual clogged ports, then employ a Venturi tube brush to remove stubborn blockages and insect nests from burner tubes. Regular maintenance of burners helps avoid buildup of grease that can compromise heating performance. Soak burners in warm soapy water, scrubbing gently with soft brushes to break down grease buildup. For best results, consider periodic deep cleaning once or twice a season depending on your grill usage. You can also use alternatives like onions for removing stubborn grime from burner components. Rinse thoroughly until all soap residue disappears. Dry completely before reinstalling and securing screws firmly to prevent gas leaks. For added protection, always disconnect the propane tank before beginning any burner cleaning work. Over time, rust can corrode burner components and weaken your grill’s structural integrity, so proper drying after cleaning prevents rust formation on metal parts. For optimal results, use wire brush and baking soda on any remaining interior debris around the burner area before final reassembly.

CLEARS SPIDER WEBS & BLOCKAGES - The FryOilSaver Company B76C gas grill venturi tube brush removes spider webs, grease, and debris that clog burner pipes, restoring proper gas flow and preventing dangerous flare-ups. Ideal for homeowners and BBQ enthusiasts who grill year-round and need reliable maintenance for safe, even heating.

Bristle-Free Safety: Built without bristles, this grill cleaning brush eliminates the risk of bristle ingestion, offering a safe and reliable option for deep-cleaning your gas grill's venturi tubes.

Durable Stainless Steel Construction: Made from durable stainless steel for long-lasting use.
Applying Baking Soda and Vinegar to the Interior
To create an effective foaming solution for your grill’s interior, you’ll combine two cups of white vinegar with one cup of baking soda, which immediately activates upon mixing. This chemical reaction generates the foaming action that maximizes cleaning effectiveness on all interior surfaces.
You can dust baking soda directly onto the grill’s bottom and sides, then spray vinegar to intensify contact. For stubborn areas, apply the mixture as a paste using ¼ cup dish soap, ¼ cup white vinegar, and 1½ cups baking soda.
Focus application on grease accumulation and ash buildup zones. Use a moist cloth soaked in vinegar and dusted with baking soda for difficult-to-reach spots. For optimal results, pair this interior cleaning with regular grate removal to ensure thorough access to all surfaces. While vinegar and baking soda work effectively, specialized metal scrapers provide superior grime removal on stubborn carbon buildup. After cleaning, the re-seasoning process with high smoke point oil protects cast iron grates from future corrosion. After cleaning, consider applying high smoke point cooking oil to cast iron grates to maintain a protective, non-stick layer and prevent rusting. This maintenance step complements the deep cleaning approach by protecting your grates between routine maintenance sessions. Guarantee consistent coverage across both horizontal and vertical surfaces before allowing adequate sitting time for the solution to break down contaminants effectively. Proper timing ensures the vinegar and baking soda mixture can penetrate stubborn residue and carbon buildup for superior results.
Creating and Using the Baking Soda Paste
After establishing your foaming solution strategy, you’ll now focus on crafting a paste that adheres to grill surfaces and works synergistically with vinegar. Combine baking soda with water in a bowl, stirring until you achieve a thick, spreadable texture—not runny. Add minimal water to maintain spreadability and guarantee the paste holds on vertical surfaces like grates. For enhanced grease removal, incorporate a small amount of dish detergent like Dawn into your paste ingredients.
Mix thoroughly for even consistency within two minutes using just a spoon or spatula. Your paste consistency should resemble standard oven-cleaning paste, dense enough to maintain contact during a 15-30 minute dwell time. This mild abrasive formula dissolves food residue and grime while preparing surfaces for vinegar’s fizzing action. For surfaces requiring heavier-duty cleaning, pumice-based cleaning bricks offer an alternative abrasive option that removes stubborn residues without scratching steel surfaces. The rhythmic exploration of layering your paste application ensures comprehensive coverage across all grill surfaces. After applying the paste to your cool grill grates, allow it to set for approximately 30 minutes to maximize its cleaning effectiveness. When scrubbing away loosened debris, use circular motions from the center outward to avoid spreading residue across the cooking surface. Using a grill pad underneath your grill can help protect your patio or grass from grease drips while you’re performing this deep cleaning maintenance. For cast iron grates, this extended dwell time is particularly important due to their porous nature and need for thorough cleaning before any protective seasoning can be applied. Wooden grill scrapers like wooden grill scrapers offer a gentler alternative once the paste has loosened grime, preventing bristle debris and safely removing stubborn residues without damaging your cooking surface.
Scrubbing Grates and Surfaces
Once you’ve allowed the baking soda paste to sit for 15-30 minutes, the chemical reaction between vinegar and baking soda begins its work—the bubbling action lifts stubborn grease and food residue while the mild abrasive breaks down accumulated buildup on your grates.
Start your scrubbing motion with soft-sided pads, progressively moving to nylon-bristled brushes for stubborn caked-on grime. When using wire brushes carefully on interior grates, apply light pressure to remove large chunks while preserving seasoning layers. Focus your scrubbing motion on areas with visible oil and residue accumulation, working systematically across all surfaces. This graduated approach minimizes grate damage while maximizing debris removal. For a chemical-free alternative, you can also try the onion rubbing method to remove light carbonization and charred food from grill surfaces. Maintaining proper heat control during grilling also helps prevent excessive buildup on your grates. For heavily caked buildup that resists natural methods, you may want to consider commercial grill cleaners as an alternative approach. After removing rust and buildup, re-season the grill to protect it from future rust formation and maintain its non-stick surface, using high-smoke-point oils that polymerize into a durable protective layer. Rinse thoroughly with warm water to eliminate all loosened particles and cleaning residue before drying completely.
Cleaning the Drip Pan
Your grill’s drip pan collects grease and debris that’d otherwise accumulate in the interior basin, making it essential to remove and clean separately during your deep cleaning process. Begin by sprinkling baking soda liberally throughout the pan area, then spray a 50/50 vinegar-water mixture over it. Allow five minutes for the foaming reaction to break down stubborn grease buildup. Use a plastic putty knife to scrape accumulated debris into the tray, preventing damage to your grill’s finish. Once loosened, dispose of large grease chunks using your preferred disposal techniques. Clean the interior basin with hot soapy water and rinse thoroughly, allowing excess water to drain into a temporary bucket. Wipe surfaces dry, then reinstall the cleaned drip pan. For best results, empty and wash the grease tray after each cook to prevent excessive accumulation. Regular drip pan maintenance is one of the key factors that can extend a grill’s lifespan significantly. When transporting your grill or performing maintenance that requires removing the drip pan, ensure you turn off the gas supply at the tank’s valve to prevent leaks and maintain safety. Consider investing in a durable grill cover to protect your grill from weather elements when not in use, which helps prevent rust and extends the life of components like the drip pan. Before beginning any grill maintenance work, consider using professional junk removal services if you need assistance with heavy lifting or complex disassembly. Keep a Class B fire extinguisher nearby during grill maintenance to safely handle any unexpected grease fires or propane-related incidents. A replacement drip pan should be considered if the original shows signs of rust or corrosion that compromise its function. This recurring maintenance step guarantees optimal performance and longevity.

Professional Cleaning Kit - By using our's griddle / grill cleaning kit can quick clean grease, stains, food residue on the griddle top. This grill / griddle cleaner tool make your griddle gleaming in a short time with less effort and without any scratches. This amazing flat top grill cleaner set includes 1 griddle scraper, 12 scouring pads with 1 handle, 2 grill bricks with 1 handle,1 silicone spatula mat, which makes our griddle accessories kit for you.

Compatibility: genesis ii drip pan for weber grill drip pan replacement, weber grease tray replacement. spirit grease tray liner for weber genesis 2 drip tray, weber genesis grease catch pan, weber spirit drip pan, weber spirit grease tray. ✅Compatible with original part number: for weber grill grease tray 93305 83156 7515, weber 6415 drip pans. Genesis grease catch pan perfect fit Weber gs4 Genesis II 300/400 Series, Weber Spirit 200/300 Series Gas Grills.

BBQ Grill Cleaner: CitruSafe is a pioneer in the grilling industry by manufacturing the first spray specifically formulated to provide a simple, safe, yet powerful alternative to cleaning a barbecue grill’s cooking surfaces (grates). CitruSafe BBQ Grill Cleaner utilizes the cleaning power of citrus peels to provide a natural degreaser. CitruSafe not only saves fuel, but also avoids the unnecessary risks associated with ingesting bristles from wire grill brushes.
Reassembly and Maintenance Tips
Now that you’ve thoroughly cleaned every component, proper part alignment ensures your grill operates safely and efficiently. Guarantee all burners reinstall correctly according to your manual, positioning grates snugly and securely. Reattach control knobs after they’ve dried completely.
Next, perform post-reassembly checks by inspecting connections for damage and verifying burner and igniter function. Run your grill on high for ten minutes to clear burner ports, then confirm no blockages remain using a wire brush. Be sure to tighten all fasteners to maintain a stable base for your grill. Regular cleaning of venturi tubes prevents pest nests and fuel-air delivery blockages that compromise performance. Consider installing a heat tent to protect your burners from grease buildup and flare-ups during use.
For consistent seasoning application, coat clean grates with high-heat cooking oil and heat for fifteen minutes. Before each grilling session, lightly oil your grates to prevent sticking and inhibit rust. This seasoning process enhances non-stick properties substantially while protecting against corrosion and extending your grill’s lifespan. Stainless steel components on your grill resist heat and prevent rust during extended use. To maintain brightness and prevent corrosion on exterior stainless parts, incorporate regular light cleaning into your maintenance routine. When cleaning, check for signs of pitting or corrosion that may indicate deeper damage requiring component replacement.
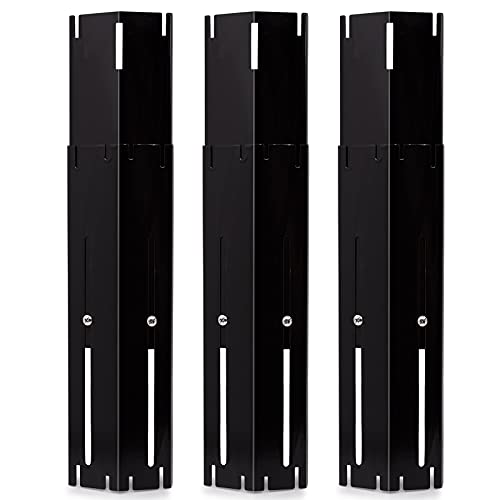
【DIMENSIONS】Contains THREE grill deflector plates, which has a 2-piece telescoping design. Each grill adjustable heat plate measures 3.75-inches wide and has an adjustable length of 11.75 to 21-inches.

Adjustable grill heat plates extend from 11.75” up to 21” long, 3.75” wide, fits most outdoor gas grills such as charbroil, nexgrill and etc. If installed reversely, the length will be extended from 11.75” to 18.37” only. Please measure the width of the mounting slot on your grill to confirm compatibility before ordering

Heat Plate Dimensions: 14 9/16 x 3 3/8'', Material: Porcelain Steel; Kindly Compare With The SIZE And MODEL Of Your Original Parts Before Purchasing. ▶ Package Contents: Includes 4 Heat Plates / heat shield / Flavorizer Bar/ Burner Cover/ Flame Tamer.