You’ll keep your grill operating beautifully by following key maintenance steps. After each use, let your grill cool, then wipe the exterior with soapy water and soak grates to loosen residue. Use brass-bristle brushes or baking soda-vinegar paste for stubborn buildup. Don’t forget interior scraping, burner unclogging, and applying protective oil to prevent rust. Regular cleaning prevents corrosion and extends your grill’s lifespan vastly. Mastering these techniques guarantees consistent cooking results year-round, and there’s much more to uncover about deep cleaning schedules and component maintenance.
Post-Use Cleaning Steps
You’ll want to power down your grill and let it cool completely before you touch anything—this paramount step prevents burns and lets grease solidify for easier removal. Slip on fresh gloves to protect your hands throughout the process.
Start by wiping the cooktop perimeter and surrounding flat areas with paper towels and soapy water, targeting accumulated oils and drippings. Use a soft cloth to prevent finish damage, paying special attention to corners where debris collects. Regular cleaning of your exterior prevents corrosion and rust buildup that can compromise your grill’s longevity. A simple dish soap and warm water mixture serves as an effective and safer alternative to harsh chemical grill cleaners for routine maintenance. For heavily soiled grates, soak them in warm, soapy water to loosen stubborn food residue.
Next, tackle internal walls with a grill brush and warm soapy water. For stubborn buildup and rust spots, employ material restoration techniques using a wire brush or brillo pad. Consider using a baking soda and vinegar paste for particularly tough rust before scrubbing. A garden hose rinses thoroughly afterward. You can also try the onion cleaning method, which removes light carbonization and charred food in a chemical-free way by rubbing a cut onion across the grill grates. For exterior stainless steel surfaces, test-spot any cleaner on an inconspicuous area first to ensure it won’t damage your grill’s finish. You can also create homemade sprays with natural ingredients like lemon juice to enhance your cleaning power without toxic chemicals. Apply vegetable oil to rusted areas as part of your grease disposal options and corrosion prevention strategy.

【Easy Cleaning】: Consists of 3 rows of thicker stainless-steel bristles that are in perfect balance between stiff and flexible - neither too rigid so cause unwanted scratch nor easy to be flatten out so lead to useless, just a simple rotate, you can 360° thoroughly clean every bit of stubborn stains out of all corners & edges of your grill, not just the top; Along with an extra solid and sharp scraper, cut your cleaning time in half is definitely not a dream!
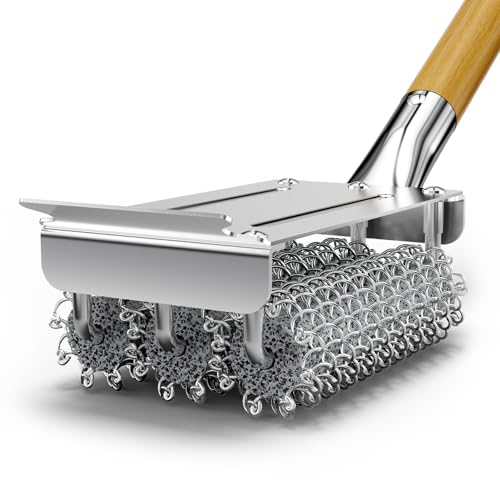
【100% BRISTLE-FREE SAFETY】 - Maximum Safety for Your Family!Say goodbye to the hidden danger of wire bristles breaking off and ending up in your food. Our innovative stainless steel Patented Design features no sharp edges or loose wires, ensuring a safer grilling experience. You can enjoy your BBQ with total peace of mind, knowing your family’s health is protected from metal ingestion risks.

Efficient 2-in-1 Grill Scraper: Cut cleaning time with this dual-action tool. The sharp stainless steel scraper chips away stubborn residue, while thick bristles remove heavy grease instantly. The ultimate solution for restoring dirty gas or charcoal grills quickly
Grate Cleaning Techniques
Your grill grates deserve as much attention as the cooking surface itself—they’re where food makes direct contact and where grease and carbon buildup accumulate fastest. You’ll find multiple effective approaches depending on your grate material.
For cast iron restoration, use a brass-bristle brush or wire wheel to protect seasoning while removing debris. A baking soda mixture works exceptionally well: combine one cup baking soda with two cups vinegar, then scrub with a stainless steel scrubber. Rinse thoroughly and reapply vegetable oil to preserve the protective coating. Consistent post-use brushing with a brass bristle brush makes deeper cleanings much easier and prevents the hardening of food particles. Proper identification of your grate material type ensures you use the correct cleaning method and avoid damage to protective coatings. For additional grime removal alternatives, consider using onions for natural cleaning by rubbing them across warm grates to break down buildup. Preheating your grill to high temperatures around 500-550°F before brushing helps loosen carbon buildup more effectively. Bristle-free grill brushes with triple helix designs eliminate the risk of bristles contaminating your food while providing thorough cleaning power. Wooden grill scrapers offer a safer alternative to wire brushes by eliminating bristle risks while effectively removing stubborn residues. Cast iron’s superior heat retention and searing capabilities make it worth the extra maintenance effort required to keep it properly seasoned.
Stainless steel grates respond well to pressure washing at 1500-2000 PSI with a 40° nozzle. First soak them in degreaser, maintaining an 8-10 inch distance while using sweeping motions. For stubborn buildup, a rotary surface cleaner dramatically improves results with minimal effort. Stainless steel offers excellent rust resistance compared to bare metal alternatives, making it ideal for low-maintenance outdoor cooking.

This grill brush features a black body with a grey grip.

You Want A Clean Grill Without Having To Worry About Your Family's Safety: We get it. Bristles are great for cleaning your grill, but are a HORRIBLE addition to your deliciously grilled meal. That’s why Grillaholics Essentials Grill Cleaning Brush is built from heavy duty stainless brass and triple machine tested to the highest safety standards. Our brushes are 50% stronger and last 25% longer than other inferior grill brushes.
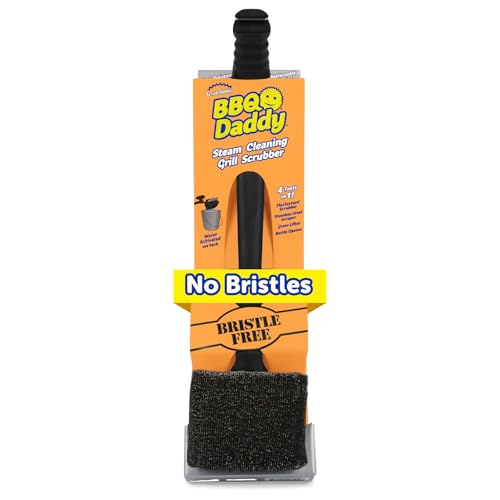
Clean with Steam, Not Bristles - Scrub Daddy Bristle Free Grill Brush for outdoor grills, uses a FlexTexture core that firms in cold water, and steam from the grill help the head soften to reach into grates for efficient grill cleaning.
Interior Cleaning Methods
Once you’ve restored your grates to pristine condition, it’s time to tackle what lies beneath—the firebox and internal components where grease, ash, and carbon accumulate in layers. Start your firebox condition assessment by placing a bucket below the opening, then scrape away caked-on debris. Use a wet or dry vacuum to eliminate remnants, followed by a garden hose rinse. Scrub walls with a wire brush to prevent corrosion.
Next, address burner adjustment procedures by scraping exteriors with a grill brush individually. Unclog gas ports using a paperclip and clean tube interiors with a wire bottle brush. Use a toothbrush for flame holes. Never expose burners to water—ensure complete dryness before ignition. For optimal results, consider using bristle-free coiled designs that eliminate safety concerns while maintaining cleaning effectiveness. When selecting grill brushes, prioritize nylon-bristle options for safer cleaning around food contact surfaces. After cleaning, apply a protective layer of oil to internal surfaces to prevent rust formation. Finally, remove and wipe flame tamers with a microfiber cloth or damp rag, examining for corrosion around flame holes. Regular interior cleaning also prevents grease accumulation that can cause flare-ups during grilling. Regular interior cleaning protects the finish and ensures even heat distribution throughout your grill. Consistent firebox maintenance extends grill lifespan and prevents performance degradation from accumulated residue.
Exterior Cleaning Process
After you’ve meticulously restored the grill’s interior, the exterior deserves equally thorough attention—it’s the first thing guests notice and the primary shield against weathering. Start by wiping down surfaces with a damp cloth to remove loose debris, then apply your chosen cleaning solution—mild dish soap, Simple Green, or a baking soda-vinegar mixture for stubborn grease.
Gently scrub with non-abrasive sponges in circular motions, paying special attention to corners where grime accumulates. For stainless steel, avoid harsh chemicals that compromise finish appearance. After scrubbing, rinse thoroughly with a garden hose while protecting burners from water damage prevention concerns. In South Florida’s climate with intense sun and salty air exposure, regular exterior cleaning is critical to prevent rust and corrosion that can weaken the grill’s structural integrity. While rust is not immediately toxic if ingested in small amounts, frequent consumption of food cooked on heavily rusted grates might pose health risks and affect food taste. For stubborn grease and baked-on residue on exterior surfaces, specialized grill cleaners can dissolve buildup quickly with minimal scrubbing. Avoid using abrasive nylon brushes on the exterior surfaces as they can scratch and damage the finish. Covering the grill when not in use protects the chromium oxide layer that provides corrosion resistance. To maintain long-term protection, consider re-seasoning the grill periodically to create a protective non-stick surface that resists rust formation.
Dry immediately with microfiber towels to prevent water spots. Apply stainless steel polish for added shine and protection, buffing to a streak-free finish that restores your grill’s original aesthetic.
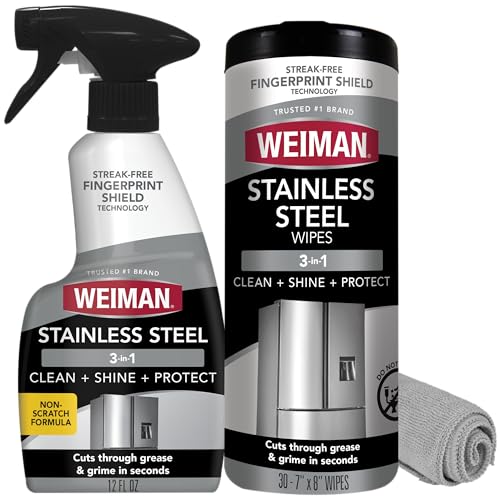
Cleans, polishes & protects stainless steel: Our stainless steel cleaner for appliances removes fingerprints, grease, residue, and water spots. This kit includes spray, which won a 2026 Good Housekeeping Cleaning Award, cloth & appliance wipes that leave a streak-free shine and a protective barrier that helps prevent future smudges.

Removes dirt and grime build-up, and is great for everyday cleaning on any exterior grill surface

Cleans, polishes & protects stainless steel: Our stainless steel cleaner for appliances, which won a 2026 Good Housekeeping Cleaning Award, helps clean delicate, hard-to-clean surfaces. This appliance cleaner removes grease, fingerprints, water spots and residue while restoring a polished, like-new shine.
Deep Cleaning Frequency and Schedule
Keeping your grill’s exterior pristine is just half the battle—the real work happens beneath the surface where grease, carbon, and residue accumulate and threaten both performance and safety. You’ll want to establish a weekly cleaning schedule as your foundation, vacuuming ash and debris after every 2-3 cooks. However, deep cleaning demands more commitment: aim for monthly sessions regardless of usage, or every 20 hours of cook time for pellet grills. Increase frequency when cooking high-fat foods like brisket or pork belly, which accelerate grease buildup monitoring. Before beginning any cleaning work, always disconnect the propane tank to ensure safe handling of your grill. Consider using safer cleaning alternatives like aluminum foil and baking soda paste, which effectively remove grime without the risks associated with wire brushes. For more effective cleaning, steam your grill grates to around 400°F temperature to soften grime before scrubbing with heat-resistant tools. Understanding your specific grill’s needs allows you to tailor a consistent care routine that addresses its unique maintenance demands. Complement these routines with seasonal deep cleans in spring and fall, including full disassembly and internal inspection. After removing and soaking your grill grates in soapy water, scrub them thoroughly with a stiff brush to loosen stubborn grime. When dealing with stubborn buildup, specialized cleaners like Bar Keepers Friend can effectively tackle tough grime and mold while maintaining your grill’s integrity. For optimal results, wear gloves and eye protection when using chemical cleaners during these comprehensive maintenance sessions. Check your drip tray monthly and empty it when half-full to prevent dangerous overflow and fire hazards.
Dismantling and Soaking Components
Deep cleaning demands disassembly—you’ll need to remove every removable part to access the hidden grime that compromises your grill’s performance. Start by unbolting wooden handles, grates, and burners with your crescent wrench and screwdriver. Slide out cotter pins on burner tube ends, then carefully pull burners upward while easing them from front attachments.
Lay newspaper beneath greasy components to contain mess. Once disassembled, begin pretreatment application by soaking grates overnight in a sealed garbage sack with vinegar and salt—this facilitates stubborn buildup effectively. For enhanced cleaning power, consider pairing vinegar with bicarbonate of soda to tackle particularly resistant grime before soaking. Avoid lining grates with aluminum foil, as it restricts airflow and can cause uneven cooking and potential health risks from aluminum particles leaching into food. Stage your component inspection after soaking; shake burners to clear debris holes and wipe surfaces with rags. For stainless steel grill bodies and exteriors, stainless steel grill cleaners can remove stubborn buildup and restore shine during the maintenance process. Over time, burner tubes can develop visible corrosion and rust that may affect cooking performance. Some grills benefit from ceramic briquettes which help distribute heat more evenly and reduce flare-ups during the cooking process. Remember to keep all nuts, bolts, and washers in a safe location for reassembly.
Hose off all soap residue thoroughly and allow complete drying before reassembly. Before storing your grill for extended periods, ensure the coals are fully extinguished by closing the grill lid and vents to cut off oxygen supply and prevent fire hazards. This methodical approach guarantees you’ll address every contaminated surface.
Grease Trap and Drip Tray Maintenance
Once you’ve reassembled your grill’s internal components, you’ll turn your attention to the grease trap and drip tray—the system that collects the byproducts of every cooking session and directly impacts your grill’s safety and performance. Locate these trays beneath your firebox and carefully remove them to prevent spills. Implement proper grease disposal procedures by following your local waste management guidelines. Clean the trays thoroughly with warm, soapy water, then rinse and dry completely before reinstalling. To prevent rust and maintain the grill’s longevity, avoid introducing excess water into the internal components during cleaning. For stubborn grease buildup on trays, consider using a salt and oil paste as a gentle abrasive to lift grime without damaging the surface. Monitor your drainage system regularly for blockages that compromise airflow and increase fire risk. Consider lining traps with aluminum foil to facilitate future cleaning. For wood pellet grills, upgrading to enclosed systems like The Grease Box provides superior spill prevention and protection against debris compared to standard pails. Grease also builds up on grill grates and shelves], so inspect these components during your maintenance routine. To maintain optimal functionality, remove and clean grease traps after each cooking session to prevent excessive buildup. Replace drip tray liners consistently to catch grease and food particles, maintaining peak operational efficiency and preventing hazardous buildup. A non-slip grill mat placed beneath your grill can also help contain spills and protect your deck from grease stains. When eventually replacing your grill, ensure you follow environmentally conscious disposal methods such as recycling metal components or donating usable parts to local organizations.

Guaranteed Perfect Fit: Our grease catcher is expertly-designed to snap securely into place and is compatible with 17", 22", 28", and 36" Blackstone griddles
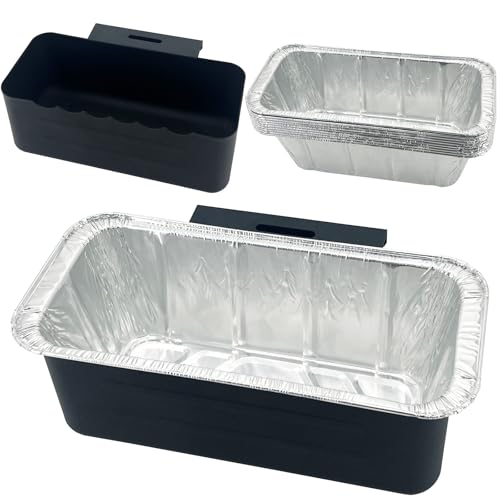
Perfect Fit for Blackstone Griddles This heavy-duty blackstone grease catcher is designed specifically for Blackstone griddles, compatible with 17 22 28 30 and 36 inch models ensuring a seamless fit for efficient grease management during outdoor cooking.

UPGRADED VERSION - Larger capacity; comes with outlet pipe, user manual & all accessories needed. The welding process is improved for a smoother welding port. Threads are added at the connect hook. Corners are rounded to prevent scratches. The cover inner side is added with a rubber ring to make sure no leakage. Also, the faucet is sealed with the ring.
Gas Lines and Burner Inspection
Your grill’s gas lines and burners are the heart of its operation, and they demand careful inspection to guarantee both safety and performance. Start by turning off the gas supply and allowing your grill to cool completely. Examine burner tubes for blockages, corrosion, or damage, checking that orifice alignment is precise over valve nozzles. Inspect gas jets and connections for debris buildup, using a paperclip or flexible wire to clear clogged ports without causing damage. Assess valve condition carefully, looking for wear or leaks around gaskets. Clean screens and air shutters with a bottle brush, removing spider webs and accumulated dirt. For stubborn debris inside burner tubes, a cleaning rod can effectively extract buildup that a brush cannot reach. Regular cleaning helps prevent these clogs and keeps airflow smooth for optimal grill performance. Verify that your gas lines meet approved safety standards and are properly sized for your grill’s BTU demand to ensure reliable operation. Using stainless steel braided hoses provides superior durability and weather resistance compared to rubber or PVC-coated alternatives, extending the lifespan of your gas delivery system. Selecting the correct propane regulator for your grill’s BTU output prevents hazards from mismatched equipment and ensures consistent performance. When reconnecting or replacing your propane tank, always ensure the tank valve is closed until the regulator is securely connected to prevent leaks and maintain safety. After reassembly, test for steady blue flames—yellow flames indicate airflow problems requiring further attention. Conduct a soap bubble test to confirm all connections are secure and leak-free before operating your grill.

Dual Connector: The 6 feet propane regulator Hose with all devices equipped with a QCC1 connection. 3/8" female flare thread. Nut threaded to 5/8"-18UNF Swivel nut 5/16" diameter low-pressure hose

3/8-inches flare fitting has an outside diameter of 5/8-inches in order to accommodate the flare seat,The Maximum 95, 000BTU per hour, low pressure propane regulator with 2feet/24inch Low Pressure LPG hose for propane gill and fire pit table, strong hose will last for a long time

【All-in-One 12FT Kit with 6 Airtight Adapters】 Includes a 350 PSI propane extension hose (12FT), 6 versatile brass adapters (3/8" Male NPT x 3/8" Male Flare | 3/8" Male Flare x 3/8" Male Flare | 3/8" Male NPT x 3/8" Male NPT | 1/2" Female NPT x 3/8" Male Flare | 1/4" Male NPT x 3/8" Male Flare | 1/8" Male NPT x 3/8" Male Flare), 1 wrench & 1 roll of sealing tape—no extra parts needed
Essential Maintenance Tips and Safety
Maintaining a grill’s performance and safety hinges on consistent, deliberate care that goes beyond the initial cleaning. You’ll protect your investment through strategic cover storage and seasonal protection practices. When you’re not grilling, invest in a quality, weather-resistant cover with cloth inner lining—it wicks moisture away and prevents rust formation. Look for covers with fire-retardant vinyl that resist cracking and fading while enduring harsh weather conditions. Avoid plastic sheet covers, which trap humidity and accelerate corrosion. During colder months, store your grill indoors in a garage or shed when possible for ideal protection. Empty grease trays before buildup becomes a fire hazard, and remove charcoal ash after each use to maintain airflow and temperature control. Always keep your grill on a stable, level surface to prevent tipping hazards and ensure safe operation. For optimal base stability, consider placing your grill on non-combustible materials like cinder blocks that can safely support the weight without fire risk. Before each grilling session, heat your grill on high for 15 minutes to burn off residual food particles and eliminate built-up grease. Using grill mats for gas grills can further simplify cleanup and protect your cooking surface from debris and grease buildup. Fire-resistant grill pads made from recycled materials offer additional protection for your deck or patio while preventing damage to underlying surfaces. For external grill surfaces showing rust or wear, Rust-Oleum High Heat Spray Paint provides durable corrosion resistance and can withstand high temperatures to restore your grill’s appearance. Regular attention to these details extends your grill’s lifespan by approximately 50% and guarantees safe, reliable cooking conditions throughout the season.