To safely disconnect your propane tank, you’ll first turn off all burners and close the tank valve clockwise. Locate the coupling nut and turn it counterclockwise by hand to disconnect the regulator hose. Lift the tank upright and inspect it for damage or rust. Perform a soap bubble test on all connection points to verify no leaks exist. Store the tank in a cool, dry location away from sunlight. Following these steps properly guarantees you’ll prevent dangerous gas leaks and damage—though there’s considerably more detail worth exploring about transport protocols and long-term maintenance.
Preparation Steps
How can you safely disconnect your propane tank if you haven’t properly prepared? You’ll start by turning off all grill burners completely, verifying that flames extinguish fully and no heat remains on the surface. Allow the burners to cool slightly for safety.
Next, locate your propane cylinder, typically positioned behind an access door. Inspect it for visible damage and confirm it’s in an upright position. Clear any surrounding obstacles to guarantee adequate removal space. The standard 20-pound tank is the most common size found on residential grills and fits most storage compartments.
Prepare your work area by selecting a well-ventilated outdoor location with proper lighting and safe lighting conditions. Remove flammable materials from the vicinity and wear protective gloves. Position your tools nearby for quick access, and make certain you’re working on a stable, level surface for tank placement. Since propane tanks can retain moisture when stored outdoors, ensure your work surface is non-combustible material to prevent any fire hazards. Keep a Class B fire extinguisher nearby in case of accidental propane leaks during the disconnection process. For added safety during this process, consider using a pressure regulator to help control any residual gas pressure. Once your grill is fully secured and ready, identify the tank valve and pressure regulator before proceeding with any disconnection steps. Always ensure the tank valve is closed to prevent any propane leakage during the preparation phase. Conduct a final check using a soap bubble test to verify there are no existing leaks before you begin the disconnection process.
Closing Tank Valve
Before you disconnect the regulator from your propane tank, you’ll need to close the tank’s valve by turning it clockwise until it’s fully sealed. Use a slow, deliberate clockwise turning motion to prevent sudden pressure changes within the gas lines. Apply only hand tightness requirement—avoid over-tightening, which can damage the valve mechanism.
Rotate the handle until it aligns completely with the closed position, then stop. This seals the valve and prevents gas pressure buildup during regulator disconnection. Visual inspection confirms proper alignment before proceeding further. Closing the valve decreases high gas pressure from the propane cylinder to prevent unsafe conditions during removal. A full 20-pound propane tank contains approximately 430,000 BTUs of energy, so proper valve closure is critical for safe handling. Selecting the right propane regulator for your specific grill ensures compatibility and prevents pressure-related hazards during disconnection. Most quality grills feature durable porcelain-enameled cast-iron grates that require proper maintenance when the tank is disconnected for storage or replacement.
After closure, test the seal by gently disconnecting the hose; you’ll hear a slight hissing sound indicating pressure release. This confirms successful valve sealing and protects your regulator from potential damage during removal. Unlike natural gas, which is piped in and cannot run out mid-cook, propane requires proper tank management and storage to ensure reliable fuel availability. When storing your grill between uses, keep the tank in a cool, dry location away from direct sunlight to maintain propane cylinder safety. Always ensure the propane grill is turned off before beginning this disconnection process to maintain maximum safety.
Disconnecting Regulator
With your tank valve now sealed, you’re ready to disconnect the regulator from the propane tank. Locate the coupling nut connecting the regulator to the tank and turn it counterclockwise by hand. For Acme thread fittings, you may need hand nut engagement. If you’re troubleshooting regulator issues or replacing regulator components, this disconnection step is essential.
For quick coupler designs, pull back the sleeve to extract the nipple from the coupler. Move deliberately to prevent rushing gas that could damage components. Once disconnected, set the regulator hose assembly aside in a safe, dry location to prevent corrosion and contamination. Coil the hose properly to avoid kinks that restrict gas flow during future reconnection. To extend the life of your hose, consider investing in stainless steel braided hoses, which offer superior weather resistance and durability compared to rubber alternatives. Stainless steel construction also resists the corrosive effects of moisture and outdoor elements far better than standard materials. For maximum protection of your grill’s exterior, you can apply heat-resistant spray paint designed to withstand high temperatures and prevent rust on metal surfaces. Just as UV-resistant covers protect your grill from weather damage, quality hose materials ensure your propane system remains protected from environmental degradation. For additional exterior maintenance, products like Trinova Stainless Steel Cleaner and Polish can help maintain the appearance of your grill’s stainless steel components while protecting them from the elements.

Propane Hose with Regulator: This propane hose is designed for appliances equipped with a QCC1 connection. It features a 3/8-inch female flare fitting and a 5/16-inch diameter low-pressure hose, with a built-in regulator

Propane Hose with Regulator: This propane hose is suitable for appliances equipped with a QCC1 connection. It features a 3/8" female flare thread connection and a 5/16" diameter low-pressure hose; the integrated regulator maintains a fixed output pressure of 11" WC.
Removing Cylinder
Now that you’ve disconnected the regulator, you’re ready to remove the propane cylinder itself. Carefully lift the tank off the platform to perform a cylinder weight inspection and assess its overall condition. Check for visible damage, rust, or dents that might compromise safety during transport. Once you’ve completed your cylinder condition assessment, loosen any restraining bolts or screws securing the tank to the barbecue structure. Systematically remove all fasteners to guarantee complete disconnection. After verifying all connections are fully released, carefully pull the cylinder away from the grill assembly. Handle the tank with deliberate movements, avoiding drops or impact that could release residual gas. Keep the cylinder upright throughout removal and maintain control to prevent tipping or structural damage. A grill mat placed underneath your grill can help protect your deck surface from any accidental spills or damage during tank removal and reinstallation. Fire-resistant mats made from recycled tire rubber offer durable protection for your patio or deck during maintenance work. Premium grill mats can withstand high peak temperature tolerance and provide superior durability for long-term use. Choosing a mat with a raised lip to catch spills will prevent propane or maintenance fluids from damaging your deck boards. Do not store the tank near anything flammable until you can return it through a proper propane exchange program. Before transporting the old tank, ensure you have gloves for grip to safely handle the cylinder and prevent slipping during movement.

Fire Retardant & Widely Applied - Our heavy-duty fiberglass blanket is fire retardant, effectively preventing accidents, injuries, and property damage caused by sparks, flares, and splatter. It serves not only as a reliable welding blanket for draping over equipment or floors but also as an emergency survival fire blanket or a vertical shield. Plus, it’s an excellent protective mat for outdoor camping and barbecues.

【Large Under Grill Mat】 79*39 inches large double-sided fireproof under grill mat for Blackstone all grills & most family-sized grills, prevents sparks, oil, food residues, and keeps decks, patios and lawns clean and tidy.

【Protect Deck and Lawn】 48*30 inch double-sided fireproof grill mat for use under grill, prevents high temperatures, resists sparks, oil, food residue, and keeps decks, patios and lawns clean and tidy.
Leak Checks
After you’ve removed the propane cylinder, you’ll need to perform a thorough leak check before reconnecting or storing your tank. Start your propane inspection by mixing a 50/50 soapy water solution and applying it to all connection points, the regulator, and hose assembly. Open the tank valve without igniting the grill to pressurize the system. Watch for bubbles forming—they indicate escaping gas. Simultaneously, inspect the tank exterior for dents, rust, corrosion, or bulges. Check the regulator face seal for cracks or deformation. If you detect bubbles or smell rotten eggs, immediately gas shut off the tank valve and stop testing. You should also examine all grill hoses for cracking and brittleness before proceeding further with your inspection. For best results, apply a protective layer of cooking oil to metal components after cleaning to prevent rust formation on your tank and connections. Consider using nylon-bristle grill brushes for safe cleaning of grates and interior surfaces before storing your grill long-term. To extend the life and performance of your grill, incorporate regular maintenance checks into your routine propane tank inspections and consider stainless steel or porcelain-coated grates for better rust resistance. For additional protection against corrosion during storage, you can also make a baking soda and vinegar paste to clean and protect metal surfaces from rust. Propane on its own does not have a noticeable smell, which is why manufacturers add an artificial odor to help identify gas leaks during your inspection. Don’t attempt repairs on compromised regulators or valves; instead, replace the faulty tank at a hardware store or gas station.

Pinpoint Leaks with Precision - Symptoms of a pool leak may include rising water bills, chemical imbalance, algae blooms, or cracks in structure. Our DIY leak detection kit helps you quickly identify the exact source of the leak in your in-ground pool, above-ground pool, or hot tub for faster repairs.

Efficient Charging and Multi-Gas Detection: The PT760 Rechargeable Gas Detector features a Type-C charging port for swift power replenishment. This device is capable of precisely detecting a range of combustible gases, including LPG, methane, ethane, propane, butane, natural gas, coal gas, and gas fuel, effectively pinpointing any gas leaks. It's an essential tool for your daily gas equipment usage, offering reliable support for maintenance (Point-to-point leak detection: keep the sensor 1-5 cm from the leak point, which is different from a smoke alarm.)

Propane Regulator Rv Propane Regulator 2 Tank Hoses: RV propane regulator and propane hose all fitting connectors made of 100% Solid Brass, Propane regulator with CSA Certification, propane regulator is not only durable but also corrosion-resistant, making it ideal for use in outdoor environments. Master cylinder capacity 210,000BTU/Hour; Reserve cylinder 130,000BTU/Hour, double stage design maintains constant gas inlets are 1/4"SAE inverted flare and outlet is 3/8 "NPT female pipe thread.
Transport and Storage
Proper transport and storage of your propane tank demands careful attention to positioning, securing, ventilation, and quantity limits—all critical factors that’ll keep you safe and compliant with DOT regulations. You must maintain your tank in upright vertical position during transport to prevent pressure relief valve damage and propane release.
Proper securing methods include ratchet straps, ropes, or Tank Ties anchored to vehicle points, preventing shifting and potential projectile hazards. Ventilation requirements during transport mandate well-ventilated vehicles; open pickup beds work best, while enclosed vehicles need cracked windows for adequate airflow. For enclosed vehicles, remember that you cannot exceed 4 cylinders and 90 lbs total propane capacity to remain compliant with regulations. When transporting propane, always avoid exceeding DOT weight limits to ensure your vehicle can safely handle the load without compromising braking or handling capabilities. For portable gas grills used in camping or RV travel, propane remains the fuel type preferred over charcoal due to its convenience and ease of transport. Consider keeping spare 16-oz cylinders on hand for extended camping trips since standard tanks typically last 1.5–2 hours on high.
Store cylinders upright, off ground, in flat, dry areas away from water and high-traffic zones. Keep valves closed and maintain separation from flammable materials. When selecting a portable grill for transport, prioritize models with folding legs and wheels to minimize storage footprint and facilitate easier movement to your vehicle. Install propane detectors in storage areas. For marine applications, marine-grade stainless steel components help resist corrosion from salt water exposure when storing propane tanks near vessels. For pontoon boat adventures, ensure your propane tank is properly secured using secure mounting to square railings if your grill is permanently installed on your vessel.
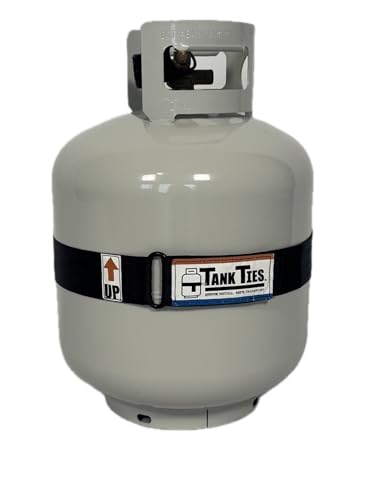
🔒 TRANSPORT PROPANE SAFELY — Stop risking damage to your vehicle, your cargo, and yourself. Tank Tie keeps your 20lb propane tank locked upright and secure on every trip to the exchange or refill station. No more sliding, tipping, or rolling tanks.

Fit Type: Universal Fit
Item Package Dimension: 27.99L x 7.59W x 7.29H inches
Safety Precautions During Disconnection
Once you’ve safely transported and stored your propane tank, you’ll need to focus on the procedures that’ll protect you during disconnection. Establish proper gas control by guaranteeing all grill burners are completely off and the main valve is fully closed before beginning work. Implement ventilation procedures in your workspace to minimize gas accumulation. Keep ignition sources—including smoking materials and open flames—far from the disconnection area. Never force threaded connections, as this risks creating leaks that compromise safety. Inspect all connectors for visible cracks, particularly on older grills exceeding twenty years. If you detect any gas odor, evacuate immediately and call emergency services from a safe location. Before disconnecting, turn the cylinder valve handwheel to the closed position to prevent LP Gas from escaping during the process. For added reliability during this critical step, consider that electronic spark igniters are commonly used on modern grills to ensure proper fuel ignition once reconnected. Always locate the pressure regulator and ensure it is properly disconnected from the tank valve. Using a propane tank gauge beforehand can help you verify the fuel level and ensure safe handling throughout the disconnection process. Verify that all connections are compatible with your specific grill model to prevent mismatches during reconnection. Consider investing in heavy-duty burner covers to protect your grill’s internal components from weather damage and debris during storage after disconnection. These precautions prevent accidents and secure controlled disconnection.
Inspecting Your Tank Before Removal
Before you disconnect your propane tank, you’ll need to conduct a thorough inspection to identify potential hazards that could compromise your safety or the integrity of your equipment. Start your tank condition assessment by examining the exterior for dents, scratches, or indentations indicating potential leaks. Perform surface anomaly detection by checking for rust, corrosion, or paint deterioration that exposes metal to elements. Rust corrodes metal over time, weakening the tank’s structure and potentially leading to costly repairs or replacements. Inspect the tank collar, foot ring, and connections for damage or deformation. Verify the tank remains upright and stable. Next, examine hoses for cracks, kinks, or damage. Test all connections using a 50% water and 50% soap solution—bubbles signal leaks requiring repair. For heavily corroded tanks, consider using a degreaser safe for metal surfaces to clean away buildup before final inspection. Always keep your spare cylinder away from the BBQ and other potential ignition sources to prevent accidents during storage and handling. Storing your tank in a cool, dry and ventilated space will help prevent the rust and corrosion issues you’re inspecting for during regular maintenance. Avoid placing aluminum foil or other materials near your propane tank storage area, as improper storage methods can create heat distribution problems that increase fire risk. When disconnecting, ensure you use approved fittings and adapters to maintain safety standards throughout the removal process. For propane tanks specifically, ensure your regulator is appropriate for your fuel type, as high-pressure propane regulators operate differently than natural gas systems and require proper matching to your equipment. Finally, confirm the requalification date on the tank collar complies with Department of Transportation requirements, ensuring legal and safe operation.

Never Run Out of Propane Again: This propane tank gauge helps you easily monitor your remaining propane level and know when it's time for a refill, helping prevent unexpected fuel shortages and interruptions during use. Enjoy greater convenience and peace of mind with every propane-powered activity.

WIDE APPLICABILITY:The propane adapter hose regulator kit comes with brass connector, which fits snugly on Blackstone 17" and 22" tabletop griddles,Tight connection, less leakage risk.

NEVER RUN OUT OF PROPANE - Grill, camp, and heat with ease without the worry of running out of propane; the propane gauge will show when you're running low, so you never run out
Post-Disconnection Verification
After you’ve reconnected your propane tank to your grill, you’ll need to verify that all components are functioning safely and leak-free. Start with a visual inspection of your regulator attachment, ensuring it’s securely fastened to the tank valve. Check that the POL hose is tightened counterclockwise and wrenched snug, with no visible damage to hose or fittings.
Next, perform a valve functionality check by slowly reopening the tank valve after reconnection. Turn the handwheel smoothly without resistance, confirming it operates properly. Finally, conduct a leak test by spraying a soapy solution on all fittings and connections. Bubbles indicate a gas leak; no bubbles confirm a tight, leak-free seal. Close the valve immediately if you detect any irregularities during testing. Unlike charcoal grills that require cutting off oxygen supply to extinguish safely, propane grills demand immediate valve closure if leaks are detected. To maintain your grill’s safety and performance, perform regular maintenance on all components including burner tubes and grease collection areas, such as emptying and wiping the drip pan to prevent buildup and pest attraction. Proper maintenance and timely repairs of your grill components can significantly extend your grill’s lifespan. Ensure the tank is properly strapped down to prevent movement or accidental disconnection during operation. Remember to verify your tank is certified before reconnecting to ensure safe and proper operation.