You’ll need to verify all control knobs are off, inspect your tank’s exterior for damage, and examine hoses for cracks before connecting. Position your propane tank upright and align its valve with the grill’s regulator. Turn the connector clockwise using only hand pressure—never use tools. Open the tank valve counterclockwise 1-2 turns, then test all connections with soapy water to detect leaks. Schedule professional inspections regularly to maintain safe operation throughout the season.
Preparation and Safety Setup
Before you connect anything, you’ll need to perform several critical safety checks to guarantee a secure, leak-free setup. Start by verifying all control knobs are in the off position to prevent accidental gas release. Inspect the tank valve gasket carefully—it must be perfectly round and free of cracks or splits. Point the valve into sunlight for a clear view of the gasket condition.
Following proper storage guidelines, keep your propane cylinder upright and vertical at all times. Store it outdoors when not in active use, away from ignition sources. The standard 20-pound tank is the most common size for residential grilling and fits most grill storage compartments. Examine your hose and regulator for visible debris or damage before proceeding. Before attaching to your regulator, remove the safety seal to ensure proper connection. Propane tank manufacturers have engineered these components with built-in safety features to protect users during operation. For optimal durability and safety, consider using stainless steel braided hoses which offer superior weather resistance and longevity compared to rubber alternatives.
Consult your grill’s owner’s manual to determine the correct installation location and verify that your regulator is set to low pressure at 11 W.C. to avoid hazards during setup. These pre-connection precautions prevent stress on connections and confirm safe operation throughout the setup process. If you’re using a smaller portable grill, confirm valve compatibility between your chosen cylinder type and your grill’s connection point to ensure a proper fit. Popular brands like Weber, Blaze, and Alfresco offer freestanding LP grills with standardized connections for convenient tank attachment.

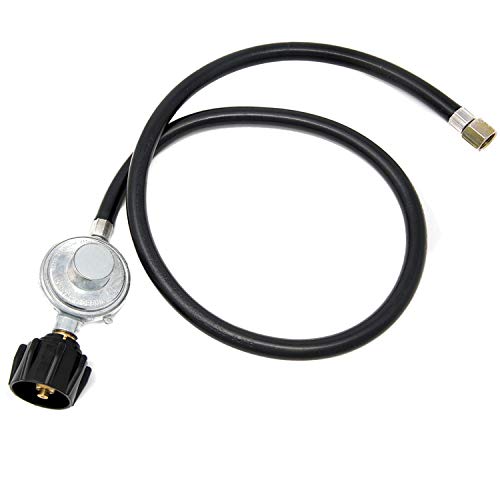
3/8-inches flare fitting has an outside diameter of 5/8-inches in order to accommodate the flare seat,The Maximum 95, 000BTU per hour, low pressure propane regulator with 2feet/24inch Low Pressure LPG hose for propane gill and fire pit table, strong hose will last for a long time

1lb to 20lb CONVERTER: Converts 1-lb propane connections to a connector that universally fits standard propane tanks (5lbs-40lbs)

【Upgraded Propane extension Hose】4ft Stainless Steel Braided Perfect fit travel trailer Propane Hose Assembly, 3/8" ID Hose Assembly including a 3/8" MNPT x 1/2" Female Flare Swivel, and come with 1/2'' Male Flare x 3/8'' Female Flare adapter fitting. Meet your device-end requirements 3/8'' female flare usage
Tank Inspection and Assessment
How thoroughly you inspect your propane tank directly impacts your grill’s safety and performance. You’ll want to examine the tank’s exterior for dents, scratches, rust, or corrosion that could compromise integrity. Check all hoses for cracks, kinks, or damage before connection.
Verify burner ports are free from rust, dirt, debris, and blockages. Inspect connections and traps for grease buildup that could create hazards. Ensure the area around your BBQ is free from combustible materials to prevent fire risks during operation. Transport your propane tank upright in a well-ventilated vehicle when moving it to your grill location. Since non-combustible materials like cinder blocks provide a stable and safe base for your grill, position your tank on an appropriate foundation away from any flammable surfaces.
During shelf inspection of your grilling area, guarantee fire extinguisher placement is accessible and functional. A 5-pound ABC model stationed within 30 feet of the grill provides effective protection against grease flare-ups and propane leaks. Apply a 50% water and soap solution to hoses and connections—bubbles indicate leaks requiring repair. Ensure all gas line connections use approved fittings and adapters that meet local building code requirements. Propane cylinders must be inspected and requalified every 10-12 years per DOT requirements to ensure safe and lawful operation. Before connecting your tank, ensure you have properly closed the tank valve to prevent accidental gas release.
Schedule professional inspection for your complete propane system if you detect issues. Don’t skip this critical assessment step; it prevents dangerous leaks and assures reliable operation.
Physical Connection Process
Now that you’ve thoroughly inspected your tank and grill components, you’re ready to set up the physical connection. Position your propane tank upright in a stable location, then align the tank’s valve with the grill’s regulator. This regulator positioning flexibility allows you to adjust the tank slightly for favorable alignment without forcing components. Before connecting, ensure the hand wheel on your propane tank is in the OFF position to prevent gas flow during setup.
Connect the tank nozzle to the grill’s gas line by turning the connector clockwise using hand pressure only. Achieve connector tightness variation that’s snug yet removable—avoid over-tightening, which damages the O-ring seal. The connection must be secure enough to prevent leaks but loose enough to allow tank replacement. For added reliability during operation, consider upgrading to a grill with electronic ignition kits that ensure consistent startup. To protect your grill investment and maintain optimal burner performance, you may also want to invest in burner covers that shield the components from weather and debris. Additionally, using durable grill mats can protect your deck surface from propane tank placement and potential leaks. Regularly inspect your venturi tubes to ensure they remain clear of debris and blockages that could affect fuel-and-air delivery. Consider installing a propane tank gauge to monitor your fuel levels and prevent running out of gas mid-grill. After completing the connection, test for leaks by applying a soapy water solution to all valve connections and watching for bubbles that would indicate an escape of gas.
Never use tools during this process. Hand-tightening guarantees you maintain proper pressure control and preserve the integrity of all connection components.
A TOP QUALITY PROPANE REGULATOR AND HOSE - maxing out at 80, 000 BTU, this 3Ft low pressure propane regulator is fiber reinforced to ensure quality performance. The hose is the perfect fit for a wide variety of grills, fire pit tables, and other propane appliances

Multi-Purpose: This gas grill regulator and hose fits most gas grills heaters fire pits LP generators lanterns two burner camping stoves and side burners ideal for low pressure propane applications. It works perfectly as a replacement for Weber Genesis 300 series Genesis Silver C Genesis Gold Genesis Platinum Spirit E-210/E-310 and is compatible with Char-broil Nexgrill Monument Dyna-Glo Brinkmann grills with 3/8" male flare fittings. It’s a top-notch gas regulator for grill and nexgrill regulator replacement option.Note: Not for Weber Traveler, Q series, or any portable gas grills

Universal Compatibility: Upgrade your outdoor cooking setup with ease. This propane hose with regulator fits Weber Genesis 300, Spirit E-210/E-310, Char-Broil, Nexgrill, and Monument grills. It is also perfect for Blackstone 28"/36" griddles, Pit Boss, Camp Chef stoves, propane patio heaters, fire pits, LP generators, and lanterns. (Note: For low-pressure appliances only; not for Weber Traveler or Q series)
Opening Gas Flow Safely
Once you’ve confirmed the connection is secure and leak-free, you’re ready to open the propane tank valve gradually by turning the handwheel counterclockwise 1-2 full turns initially. This controlled approach prevents rapid pressure surges that trigger the regulator’s flow limiting device, which would restrict gas delivery to your grill.
Position all grill control knobs to off before opening the tank valve. After opening, wait five minutes before fully engaging if regulator troubleshooting is necessary. Monitor for weak flames during initial heating, which indicates potential regulator issues requiring attention. Look for adjustable pressure regulators that allow you to control flow rates for optimal grill performance.
For gradual flow adjustment, turn burners on only after confirming leak-free operation. Detecting propane leaks through signs like a gas smell or hissing sound is essential before proceeding with heating. Heat your grill for several minutes before cooking to verify stable, consistent gas flow without fluctuations or safety device activation. Always use a soap and water solution to check for small gas leaks that may not be immediately detectable by smell alone. Understanding your tank’s runtime capacity helps you plan cooking sessions and avoid running out of fuel during a cookout. Premium grill models like the Weber Genesis SX-335s feature reliable temperature probes that help monitor consistent heating performance. Proper heat distribution during the preheating phase ensures your grill reaches the ideal temperature for even cooking across all burners.

✓ PROPANE BRASS ORIFICE FITTING SIZES - 3/8 flare M x 1/8 MNPT

Adjustable Propane Regulator: You can control the flame intensity by adjusting the pressure from 0-30 PSI according to your needs

PRECISION ADJUSTABLE OUTPUT:high pressure propane regulator reduce the gas pressure, adjust the output gas pressure by the control knob, and accurately control the flame size
Leak Detection and Testing
Because propane leaks pose serious safety risks, you’ll need to test your connections before operating your grill. Mix a 50/50 solution of water and dish soap, then apply it to all connection points—the regulator, hose, valve, and burner manifold. Slowly open your cylinder valve and watch for bubbles, which indicate escaping gas. If bubbles appear, immediately shut off the valve and tighten fittings by hand or wrench. Persistent leaks require professional attention; you may need tank replacement or hose replacement depending on where the leak originates. Absence of bubbles confirms secure connections. Always perform this test before your first seasonal use or following any tank refill to guarantee safe operation. Maintaining your grill also includes removing rust buildup on grates using safe cleaning methods without wire brushes, which can affect food safety and grilling performance. For stubborn grime, specialized cleaners can help restore grate surfaces effectively. Leak detection should be conducted before first use of the season or after prolonged disuse to maintain optimal safety standards. In addition to leak detection, keep a fire extinguisher nearby during grilling to enable quick response in case of emergencies. Professional repairs ensure safety and proper functionality when components cannot be tightened or replaced by the grill owner.
Final Operation and Maintenance
How you operate and maintain your propane grill after connection directly impacts both safety and longevity. After cooking, turn off all burner knobs sequentially, then close the tank valve by rotating it clockwise. Leave the lid open to allow heat dissipation and perform a quick safety check confirming everything’s off. Disconnect the tank only after full cooldown to prevent burns.
For tank storage options, keep empty tanks outdoors away from living areas and flammable materials. Never store in enclosed spaces. Replace the blue plastic cap on the nozzle after disconnection and guarantee the valve’s tightly closed before transport. Always return the tank through a proper propane exchange program to ensure safe handling and certification. Consider using a durable grill cover to protect your equipment during storage.
Post use cleaning maintains grill performance. Brush grates while warm to remove residue, and wipe interior surfaces. Using a fire-resistant grill pad underneath your equipment also protects your deck or patio from heat damage and grease drips during operation. For stainless steel exteriors, use stainless steel grill cleaners to remove buildup and maintain a polished appearance. Protect your hands with grill mitts during the cleaning process to prevent burns from residual heat. Propane burns twice as efficiently as natural gas, making regular maintenance essential for optimal energy use. Since propane delivers higher BTUs for quicker preheating, keeping your grill well-maintained ensures you consistently achieve peak heat performance. Schedule tank refills exclusively at certified locations to certify safety and proper maintenance standards.
Safety Tips for Ongoing Use
Vigilant pre-use inspection and leak detection are your first defense against propane hazards. You’ll examine hoses visually for abrasion and wear, then apply soap and water solution to connections for leak detection. You must never use flame to check for leaks.
During operation, you’ll keep your grill under continuous monitoring, watching for flare-ups and maintaining proper sight lines. You’ll open the lid before lighting and wait five minutes after failed ignition before attempting to relight. Always have water nearby in case of grease or food fires that may occur during cooking. If you smell gas while cooking, get away and call the fire department immediately to ensure your safety.
Your storage conditions directly impact safety. You’ll position cylinders upright in cool, well-ventilated areas outdoors only—never indoors. You’ll maintain at least ten feet’ distance from structures and environmental hazards like heat exposure. Never store spare cylinders under or near the grill where high temperatures create dangerous conditions. A weather-resistant cover can also help protect your grill and storage area from the elements during off-seasons. After your grilling session, you can safely cool your grill by closing all vents to cut off the oxygen supply to any remaining heat. Regular maintenance of drip pans and burners prevents grease buildup that could create fire hazards during operation. For additional maintenance, consider using grill cleaners designed for your grate material to keep your grill grates free from buildup that could interfere with safety mechanisms.