
You’ll grill perfect oysters by starting with live specimens cleaned under cold water and brushed free of debris. Preheat your grill to 475-500°F with the cupped shell facing down. Cook for 6-8 minutes until shells pop open and liqueur bubbles. Top each oyster with herbed garlic butter and grated Pecorino Romano, then finish for 3-4 minutes until cheese browns. The secrets to restaurant-quality results lie in the timing details and temperature management that follow.
Cleaning and Preparing Your Oysters
Before you grill fresh oysters, you’ll need to clean them thoroughly to remove dirt, debris, and sand that could compromise both the texture and taste of your dish. Start your rinsing technique by holding each oyster under cold running water, letting the stream dislodge loose particles from the shell’s exterior. Use a stiff-bristled brush to scrub away algae and stubborn debris, paying special attention to crevices where sand accumulates. Rinse again to ascertain complete removal of contaminants.
For shell preparation, sort your oysters and place them flat-side up on a clean towel to stabilize them. Visually inspect each shell for damage before proceeding. Remember that oysters are entirely edible with no waste from trimming, so you can utilize the whole shellfish in your grilling preparations. Investing in a high-quality oyster knife will make the shucking process safer and more efficient when you’re ready to prepare them for the grill. If you’re grilling indoors, a cast iron grill pan with tall ridges provides excellent heat retention for achieving superior searing on your oysters. For outdoor grilling, consider using a sauté pan with deep sides to prevent juices from dripping into the flames while maintaining even heat distribution. The Lodge Pre-Seasoned Grill Pan is particularly effective for oysters due to its even heating and quick searing capabilities. To protect your deck or patio from grease drips and heat damage, place a fire-resistant grill mat underneath your grill before cooking. After grilling, a wooden grill scraper can safely remove residue from your grates without the bristle risks associated with wire brushes. This methodical approach guarantees your oysters are ready for grilling, preventing unwanted grit and maximizing flavor potential in your final dish.

Scrubbing brush with high quality stiff fibers Brush bristles are soft and firm without damaging surfaces Scrubs large areas with ease Cleans dirt effectively

Efficient Cleaning: Ideal for scrubbing, this union fiber brush excels in cleaning various surfaces with ease, designed to handle heavy-duty cleaning

VERSATILE DUAL CONNECTIONS - STAR BRITE brush head fits all standard 3/4" threaded handles or Star brite telescoping Extend-A-Brush handles, offering ultimate compatibility
Getting Your Grill Ready
Proper grill preparation is essential to prevent shell cracking and guarantee even cooking throughout your oysters. Begin by selecting your fuel type—propane or charcoal both work effectively when you maintain grill temperature maintenance at medium to medium-high settings. Preheat your grill thoroughly, allowing the surface to reach uniform heat before placing oysters. Close the lid to create an oven-like environment that distributes heat consistently. If you’re attempting high-heat preparation, preheat to approximately 500° for brief 5-7 minute cooking windows. Listen for auditory cues; popping sounds indicate excessive heat requiring immediate reduction. Position your grill grates securely and gather heat-resistant gloves and long-handled tongs within arm’s reach. For added protection during cooking, consider wearing sunglasses to shield your eyes from potential shrapnel when oyster shells pop. Avoid cooking clusters of oysters together as they significantly increase the risk of explosive shell rupture. These precautions safeguard controlled cooking conditions for ideal results.

Heat Resistant: Our BBQ gloves are designed to provide protection for your hands while cooking, grilling, baking, or handling hot pots. With an instant heat resistance of up to 1472°F, these gloves are perfect for high-temperature cooking and baking.

【Extreme Heat Resistance】Our barbecue gloves & oven mitts, are designed to withstand temperatures up to 1472°F(Test max temperature tolerance), providing perfect protection for your hands from high temperatures whether you're grilling, baking, or cooking.

Dual-Layer Heat Protection for Safe Grilling:ANBOSON bbq gloves combine 5mil disposable nitrile gloves with cotton gloves BBQ liners for superior heat-resistant cooking. Perfect for handling hot grills, smokers, and meat shredding gloves tasks, our barbecue gloves provide safe handling of greasy foods and hot utensils while maintaining excellent flexibility
The Initial Grilling Process
Once your grill’s reached the proper temperature, you’ll place your raw oysters directly on the grates with the cupped shell facing down to cradle the briny liqueur. Balance them upright to prevent spilling. Close the grill lid immediately to maintain heat and guarantee even cooking throughout.
For gas grills at medium heat, expect 6-8 minutes of cooking time. Higher temperatures (500-700°F) require just 5-7 minutes. Watch for visual cues: the oyster liqueur’ll bubble around the shell edges, and you’ll notice slight separation between the shells.
Resist the urge to open the lid frequently. Maintaining heat consistency is essential for ideal results. You’re aiming for that golden-brown char on the meat while preserving the precious liquid inside. After spooning a teaspoon of butter mixture onto each oyster, grill for 3-4 more minutes. For precise doneness, consider using an internal temperature probe to monitor your oysters, ensuring they reach safe consumption temperatures without overcooking. The internal temperature should reach 145°F for optimal doneness, just as you would monitor when grilling other seafood. A wireless thermometer with good heat durability can help you track multiple oysters simultaneously without lifting the lid. Just like achieving a crispy sear on other seafood, ensuring your grill is properly preheated will enhance the texture and flavor of your oysters. The use of a meat thermometer ensures you remove the oysters at the right moment to avoid overcooking, as residual heat will continue cooking them slightly after removal. Carefully remove cooked oysters with tongs or an oven mitt once the shells have fully popped open.

Bluetooth Monitor Remotely: Govee Bluetooth meat thermometer lets you check the temperature of your grill, smoker, or oven from your phone. With this smart BBQ thermometer, you can multitask while grilling.

3 Connectivity Modes for Total Freedom-Bluetooth, WiFi, & Local Mode: Select different connection methods based on different scenarios. Monitor your cook from your backyard via Bluetooth, from the office using WiFi, or rely on the stable Local Mode in areas with weak signals. Stay connected and in control up to 300 feet away. This meat thermometer allows you to monitor your cooking progress no matter where you are

PERFECT DONENESS, EVERY TIME: This smart cooking thermometer takes away guesswork with real-time internal temperature updates, flip reminders, rest timers, estimated cooking times, Guided Cooking recipes, and more!
Handling Partially Opened Shells
As you prepare your oysters for grilling, you’ll need to identify and discard any that won’t close properly—a critical safety step that secures against foodborne illness. Tap each shell gently; discard any that remain gaping or produce a hollow sound. Dead oysters harbor harmful microbes undetectable by smell or appearance, posing serious contamination risks.
For safe discarding practices, remove cracked, holed, or gapped shells immediately. If an oyster doesn’t respond to tapping by closing its bill, it’s nonviable and requires disposal. Never attempt grilling partially open shells—this guarantees you’re only cooking fresh, responsive oysters. According to food safety guidelines, pathogenic microbes in nonviable oysters can cause serious health complications if consumed. Individuals in higher risk groups, such as those over 65 or with underlying health conditions, should exercise particular caution with oyster selection and preparation.
Before grilling, store live oysters at 45°F or lower. This identifying characteristic—their ability to close—confirms viability and assures the safest grilling experience possible. Additionally, ensure your grill grates are clean and free from rust buildup, as corroded surfaces can harbor bacteria and affect food quality. Keep a fire extinguisher nearby during grilling to respond quickly to any unexpected flare-ups or grease fires. Position your multipurpose extinguisher within 30 feet of the grill to ensure quick access in case of emergency. Avoid wrapping oysters in aluminum foil, as high temperatures can cause aluminum particles to leach into your food, raising potential health concerns. After grilling, allow your charcoal to cool completely by closing all vents to cut off oxygen supply, which safely extinguishes the coals for future use.
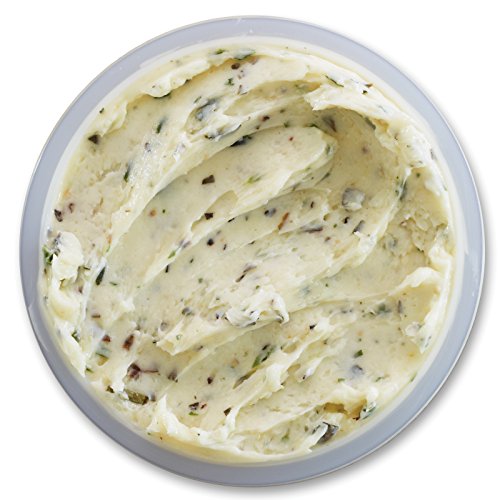
Mastering the Herbed Garlic Butter
While your oysters rest on ice before grilling, you’ll want to prepare your compound butter—the flavorful foundation that’ll elevate each bite. Start by softening half a stick of unsalted butter and processing it with fresh parsley, basil, minced garlic (6 cloves), lemon zest, and juice for about 30 seconds. Add thyme leaves, chives, paprika, and optional cayenne for depth and heat.
Transfer your mixture to a small oven-safe saucepan and place it on your grill’s cooler zone 10-15 minutes before cooking. The compound butter flavors meld beautifully as it reaches a fully melted, pourable consistency. For the best results, select medium-sized oysters that will hold the butter sauce perfectly in their shells. This melted butter application—about one teaspoon per oyster—delivers rich, aromatic seasoning that penetrates each shell. Keep the saucepan covered until you’re ready to spoon the butter onto your grilled oysters. Similar to brief marinating techniques used for other seafood, this compound butter method enhances the oysters’ natural flavor without overwhelming their delicate taste. Monitor the internal temperature of your oysters to ensure they’re fully cooked without becoming rubbery or overdone. To protect your deck surface from grease splatters and spills during grilling, consider using a grill mat that extends beyond your grill’s footprint. If you’re grilling larger quantities or want more versatile cooking surface options, a cast iron griddle can provide excellent heat retention and even distribution for managing multiple oysters at once. If you’re also preparing grilled vegetables alongside your oysters, a vegetable grilling basket prevents smaller pieces from falling through the grates while ensuring even charring. The garlic, lemon, herbs and butter combination creates a classic European pairing that is perfectly suited for hot grilled oysters.

KERRYGOLD IRISH BUTTER WITH GARLIC & HERBS: The creamy, rich texture & sweet flavor of our original, classic Pure Irish Butter, with an additional, complex layer of garlic & herb, brings any dish to life.

Steakhouse-style Butter : Blend this garlic herb seasoning with unsalted butter to create compound butter that melts perfectly over ribeye, filet mignon, or sirloin.
RICH AND SAVORY FLAVOR: Immerse your taste buds in the decadent taste of roasted garlic paired with a delightful blend of oregano, basil, and parsley in every luxurious bite of our compound butter.
Applying Toppings and Cheese
Your shucked oysters, nestled on their flattest shells in a bed of rock salt or rice, are now ready for their flavorful crowning. Spoon your herbed garlic butter mixture generously over each oyster, then add your cheese options. Pecorino Romano creates an irresistible crust, while Parmigiano-Reggiano serves as an excellent substitute. For flavor variety, you can layer Mozzarella with Parmesan or dust fresh grated Parmesan until it’s bubbly and golden. Apply cheese generously over the butter mixture before broiling. For added texture and taste, consider sprinkling panko breadcrumbs, crumbled bacon, or sautéed mushrooms and spinach. The briny oysters pair exceptionally well with smoky, savory, and rich toppings that enhance their natural ocean flavor. If you’re adding smoke flavor to your grilled oysters, use mild fruitwoods like apple or cherry rather than bold hardwoods, as these delicate proteins require subtle smoke notes. These lighter woods work particularly well for seafood because they won’t overpower the oysters’ natural sweetness the way stronger hardwoods would. Apple wood’s mild, sweet profile makes it particularly suitable for oysters and other delicate seafood since its fruity notes complement rather than mask the ocean flavors. When selecting woods for smoking seafood, avoid softwoods like pine that can leave bitter residue and unpleasant flavors on delicate proteins. Enhance your grilled oysters further by using backyard seasoning blends crafted by outdoor cooking experts to complement your toppings. For a unique presentation and mineral infusion, consider grilling your oysters on a Himalayan salt block that can withstand high temperatures while adding subtle flavor. Time your application carefully—top oysters immediately after shucking and placing them on their shells, ensuring all components meld perfectly under high heat.
NAPOLEON COMPANY Garlic Butter Oysters, 3.66 OZ

3.75 oz cans

GARLIC & HERB BUTTER SPREAD: Land O Lakes Garlic & Herb Butter Spread is packed with the bold flavors of garlic and herbs, and spreadable right out of the fridge
Perfecting the Final Cook
Getting the grill temperature just right is indispensable to transforming your topped oysters into a perfectly cooked delicacy. You’ll want to monitor shell integrity closely, watching for subtle signs that your oysters are approaching doneness. As you’re adjusting cooking temperatures, keep your grill at medium-high heat, around 475-500°F for optimal results.
Use tongs to reposition oysters if they’re cooking too rapidly in hot spots. Close the grill lid over indirect heat zones to retain moisture and guarantee even cooking. Watch for the tops to brown and edges to curl—these visual cues signal completion. You’re aiming for approximately 5 minutes total cooking time until gentle puffing occurs. Move oysters to cooler areas immediately if flare-ups develop from butter and juices. For best results, arrange oysters securely on the grill grates to prevent them from shifting during the cooking process. If you’re planning to serve smaller grilled appetizers alongside your oysters, bamboo skewers work perfectly for items like grilled vegetables or shrimp. Consider using porcelain-enameled cast iron grates for superior heat retention and those distinctive sear marks that enhance presentation. A stainless steel grate offers excellent rust resistance and easy cleaning after your oyster cook, making cleanup faster at the end of your meal. Remember that overcooking can make oysters tough or chewy, so follow your recipe precisely to maintain the ideal texture. Stand back to manage these safely while your oysters finish perfectly.
Recognizing When Oysters Are Done
How do you know when your grilled oysters have reached that perfect moment of doneness? Watch for these key doneness indicators and visual cooking cues.
You’ll notice the top shell pops open slightly as heat causes oyster contraction. The edges curl noticeably, and the meat inside firms up while bubbling occurs. The oyster liquor releases and sizzles within the shell, signifying active cooking progression. Overcooked oysters can become rubbery and lose their tenderness, which is why precise timing matters.
Monitor timing carefully—oysters typically open about a quarter-inch after 4-5 minutes on the grill. Remove them promptly when shells open and edges curl to prevent rubbery texture from overcooking. The garlic butter bubbling indicates the oysters have reached optimal temperature. To avoid flare-ups and ensure even cooking, consider using indirect heat with a drip pan positioned beneath the oysters.
Discard any stubborn unopened shells after your cooking time expires. If larger oysters aren’t opening within 8-10 minutes, move them to lower heat. These visual cues guarantee you serve perfectly cooked oysters every time.
Safe Handling and Serving Tips
Once you’ve mastered grilling oysters to perfection, proper handling and storage become equally critical to food safety and quality. You must cool cooked oysters from 60°C to 20°C within two hours, then to 4°C within four hours, following strict food service procedures. Store cooked oysters at 4°C or lower, displayed separately from raw shellfish. Never serve oysters that failed to open during cooking—discard them immediately. For shucked oysters, maintain airtight wrapping with retained juices for 4-5 days refrigeration. Oysters in the shell should be eaten soon after arrival to ensure optimal freshness and flavor. You should source oysters exclusively from certified growing areas with documented microbiological testing protocols and harvest documentation. The Canadian Shellfish Sanitation Program monitors water quality to help prevent Vibrio contamination in harvested oysters. Always verify internal temperatures reached safe minimums: 63°C according to CDC standards or 90°C for 90 seconds per EU mandates, ensuring pathogen elimination and consumer protection.


