You’ll master gas grill brisket by creating a two-zone setup with one burner lit, maintaining 220°F using a grate-level thermometer, and wrapping at 165°F internal temperature. Select a full packer brisket graded USDA Choice or Prime, trim the fat cap to 1/4 inch, and plan 1.5 to 2 hours per pound. Rest your brisket for minimum 2-3 hours at 195°F, then slice against the grain. The techniques separating good brisket from extraordinary aren’t difficult—they’re just waiting for you to uncover them.
Setting Up Your Gas Grill for Low and Slow Cooking
How do you transform your gas grill into a low and slow cooking machine? Start by creating a two-zone setup: light one burner on a three-burner grill, or two adjacent burners on a four-burner model, positioning your brisket on the opposite cooler side. Your heat adjustment techniques are critical—preheat normally, then set lit burners to low. Aim for 220°F using a grate-level digital probe thermometer, not the lid gauge. Employ fuel management strategies by partially closing vents to reduce oxygen flow, keeping top vents half-open for precise control. To maintain consistent temperature throughout your cooking session, replenish fuel periodically based on your grill’s consumption rate and the total cooking time needed for your brisket. Adjust burners based on weather conditions affecting heat stability. Models with a double-walled lid construction, like the Broil King Regal s490, offer superior wind resistance and help stabilize temperatures during extended cooks. Consider using a BBQ control fan to help maintain the low and slow temperatures necessary for even cooking and collagen breakdown. For even more precise monitoring, an app-connected probe thermometer can help track internal temperatures throughout the long cook. If you need to elevate your grill for better heat management or a more comfortable working height, placing it on cinder blocks provides a stable, non-combustible foundation that won’t warp from the heat. Preheating with all burners before adjusting to fewer burners helps maintain stable temperatures once you switch to your low and slow setup. Regular grease-trap cleaning prevents flare-ups and ensures consistent airflow, which is especially important during long smoking sessions. This setup creates the indirect heat zone essential for even, tender brisket without temperature fluctuations.

AMERICA’S TEST KITCHEN BEST CHARCOAL GRILL ACCESSORY (2021): The Slow ‘N Sear is the only charcoal basket independently tested and ranked #1 by America’s Test Kitchen. No advertising, no paid placement — just head-to-head testing against every competitor on the market. SnS Grills' products are backed by 11 patents, no imitation can replicate the engineering that earned that recognition.

Original Patented Two-Zone Cooking - From 225°F to 1000°F - The Slow 'N Sear is a patented charcoal basket insert for 22" kettle grills. Its patented curved design and radiant heat barrier create a true two-zone cooking system — a dedicated indirect smoke zone that holds 225–250°F for low-and-slow BBQ, and a direct sear zone that reaches 500–1000°F+ for high-heat searing. Smoke brisket low and slow, then remove the water reservoir and crank the heat to sear.
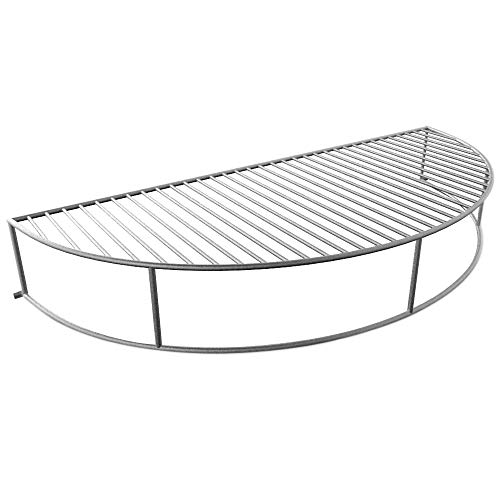
INCREASE YOUR COOKING AREA- Expansion rack adds nearly half of a full grate to your 22" charcoal grill. Great for grilling, smoking and warming anything like buns, meats and veggies. Perfect for an indirect slow grill or providing distance between a direct flame or sear.
Selecting and Trimming Your Brisket
Before you fire up your gas grill, you’ll need to select the right cut of brisket—and this choice fundamentally determines your cook’s success. Pursue a full packer brisket containing both point and flat muscles; untrimmed packers from Costco or quality local butchers yield superior results. Demand USDA Choice or Prime grades for ideal marbling and fat distribution.
Inspect your brisket critically. Look for an even white fat cap, uniform reddish-pink meat, and visible marbling on the exposed side. Perform a flexibility test—properly aged brisket folds easily, indicating tenderness and balanced muscle-fat composition. Trimming the fat cap to about 1/4 inch helps control flare-ups while retaining flavor. The connective tissue in brisket requires proper trimming to ensure even cooking and optimal tenderness. Brisket is naturally tough and requires low and slow cooking to break down collagen effectively, transforming this challenging cut into a tender masterpiece.
When choosing brisket quality, consider seasonal brisket availability; spring and summer typically offer premium selections. Trim your fat cap to quarter-inch thickness, retaining enough for moisture rendering without excessive fattiness. Many pitmasters recommend positioning your brisket fat side up during cooking to allow the fat to baste the meat naturally as it renders.
Creating the Perfect Dry Rub
A stellar dry rub‘s the foundation of brisket excellence—it’s what transforms your meat into a flavorful, bark-crusted masterpiece on the gas grill. Start with coarse black pepper and kosher salt as your base, then build complexity by customizing rub flavors with garlic powder, onion powder, and paprika. These core components create depth without overwhelming your brisket’s natural beef flavors. Remember that technique and barbecue science are ultimately more important than the rub recipe itself for achieving excellent results.
Incorporate additional spices strategically: brown sugar adds subtle sweetness, while cayenne or chili powder delivers heat. Mustard powder provides tang that enhances bark formation. Combine all ingredients in a bowl, whisking thoroughly to prevent powder separation. Use a fork to crush any clumps. Your finished rub will last up to one year when stored in an airtight container, making it convenient to prepare ahead for future grilling sessions.
Pat your brisket dry before application, then massage the rub evenly across all surfaces. Apply shortly before cooking to preserve moisture and maximize that coveted bark texture. For best results, plan on approximately 1.5 to 2 hours per pound of cooking time when maintaining a steady low temperature on your gas grill. Just as with charcoal grilling, keeping the grill lid closed where possible helps stabilize temperature and ensures consistent cooking conditions. While gas grills offer convenience, enthusiasts seeking natural flavor often turn to lump charcoal or premium options for traditional smoke-infused results. Consider using a side burner to prepare sauces or maintain warming trays while your brisket cooks on the main grates. For those looking to elevate their smoking capabilities, the Pit Boss 440 SERIES offers digital temperature control and rust-resistant construction at an accessible price point for backyard pitmasters.
![Spice Mix Recipes: Top 50 Most Delicious Dry Spice Mixes [A Seasoning Cookbook]](https://m.media-amazon.com/images/I/51tuOjGzigL._SL500_.jpg)

Authentic Latin Flavor: Experience the bold, tangy character of Traditional Mojo with a fragrant fusion of garlic, onion, and vibrant citrus that enhances meats and vegetables with every sprinkle

Jerk-Style Dry Seasoning Blend – This dry seasoning is made with a blend of spices commonly used in Jamaican-style jerk cooking and is intended to deliver a traditional jerk-inspired flavor when used as directed.
Positioning Your Brisket for Even Heat Distribution
The secret to perfectly cooked brisket lies in mastering indirect heat setup—you’ll want to position your meat on the opposite side of your ignited burners to avoid direct flame exposure and charring. Place your brisket fat-side down on a grate positioned above a drip pan, with the point facing toward your smoke box for ideal heat penetration. This configuration enables low-temperature cooking between 225°F and 250°F while minimizing flare-ups and achieving desired browning without burning.
Position a water pan adjacent to your brisket to regulate chamber temperatures uniformly and maintain moisture levels. Rotate your brisket every 45 minutes during the initial smoking phase, spinning the rack to distribute thermal stress evenly across all meat sections. This systematic rotation guarantees consistent heat exposure throughout your cook. Consider injecting your brisket with high-quality meat injection before cooking to enhance moisture and flavor penetration. Once your brisket reaches an internal temperature of 165°F, wrap it tightly to preserve moisture and continue cooking until it hits 190°F to 200°F. Wrapping the brisket in butcher paper can help maintain moisture and develop a good bark during the cook. If using wood chips to generate smoke flavor, replenish as needed throughout the cooking process to maintain the classic brisket taste that gas grills can achieve. While gas grills primarily cook through convection and conduction, understanding how heat circulates within your closed grill chamber helps you achieve more consistent results. For those seeking authentic smoky flavors without extended cook times, consider a wood pellet smoke box that delivers premium hardwood taste while maintaining the convenience of gas grilling. After cooking is complete, rest the brisket for at least an hour to ensure juicy, tender results.

Adjustable grill heat plates extend from 11.75” up to 21” long, 3.75” wide, fits most outdoor gas grills such as charbroil, nexgrill and etc. If installed reversely, the length will be extended from 11.75” to 18.37” only. Please measure the width of the mounting slot on your grill to confirm compatibility before ordering

✅ Special Notes for this item: If you are looking for parts, the BRAND and MODEL No.# listed below are just for your reference. Please Kindly check again for the SIZE and MODEL of your original parts before purchasing. if you have any problem with the item, please feel free to contact us 7 * 24 Hours, We will reply to you within 24 hours and give you a satisfactory solution.
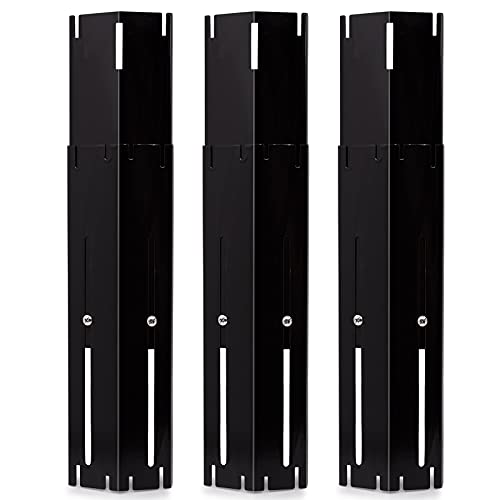
【DIMENSIONS】Contains THREE grill deflector plates, which has a 2-piece telescoping design. Each grill adjustable heat plate measures 3.75-inches wide and has an adjustable length of 11.75 to 21-inches.
Generating Smoke and Enhancing Flavor
Now that you’ve positioned your brisket for ideal heat distribution, it’s time to generate the smoke that’ll transform your meat into something extraordinary.
You’ve got two solid options: wrap wood chips in foil with holes poked through, or invest in a dedicated smoke box. Place your chosen vessel directly over the lit burner for consistent smoke production. For managing smoke flavor, use applewood chunks initially, then shift to post oak as your cook progresses. Add wood incrementally as pieces burn away—this approach prevents overwhelming the meat while maintaining smoke intensity throughout your cook. Using a Char-Broil cast iron smoke box ensures reliable smoke generation and easier refilling during your cook.
Keep your grate temperature between 225°F and 275°F. Generate smoke unwrapped for the first two hours to build that coveted bark, allowing your seasoning and smoke to bond with the meat’s surface. Use grill mitts and long tongs to safely handle the smoker box when adding fresh wood chips during the cook. Stainless steel boxes resist rust and require less maintenance if you plan to use your smoker box frequently. Consider using a digital meat thermometer to monitor your cooking progress and ensure precise temperature maintenance. If you want more authentic wood-fired taste, some pellet grills with smoke boxes allow you to burn lump charcoal or wood chunks for enhanced smoke flavor. Quality heat shields protect your burners from drippings and help vaporize juices to add extra flavor during long cooks. For cleanup after your cook, a bristle-free brush safely removes residue without leaving metal fragments on your cooking surface. This disciplined method yields authentic barbecue results on gas.

Thicker sturdy stainless steel construction will hold up great under the heat of the grill. With the unique hinged design, you can easily add or remove wood chips from the smoker box while in use.
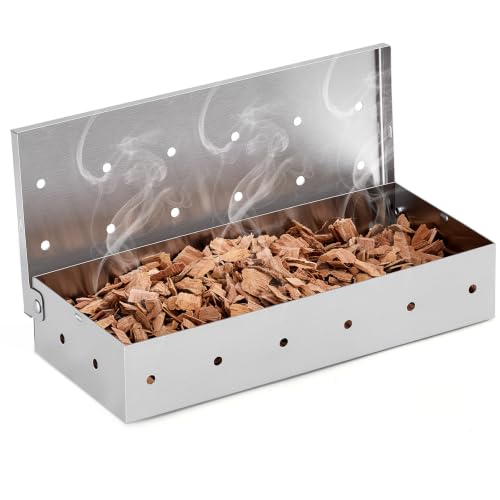
HEAVY-GAUGE STAINLESS STEEL BUILD: Made from thick stainless steel for reliable performance under high heat. Resists warping and rust for long-term use on gas grills and charcoal grills

Monitoring Temperature and Rotating Your Brisket
Once you’ve locked in your smoke production and established consistent heat, you’ll need to stay vigilant with temperature monitoring—this is where precision separates mediocre brisket from championship-quality results. Your probe placement matters critically: position your meat probe in the thickest section of the flat, avoiding bone and fat that skew readings. Use dual probes to simultaneously track internal meat temperature and ambient grill heat. Set your first alert at 170°F during the unwrapped phase, then reset to 203°F post-wrap. Temperature consistency is non-negotiable throughout your cook. Maintain 225°F to 250°F grill temperature using multiple burners if necessary, though a single burner can often achieve your target temperature with careful adjustment. Reposition probes as the meat shrinks, and verify final doneness with a secondary thermometer. Wrapping in foil when your brisket reaches 170°F will prevent evaporation and help break down collagen faster for more tender results. Some pitmasters prefer wrapping in butcher paper as an alternative that maintains better bark texture while still accelerating the cooking process. Don’t be alarmed if you encounter the stall around 150-160°F, where the internal temperature plateaus due to moisture evaporation. After wrapping, increase your grill temperature to help finish cooking until the brisket reaches 195-200°F for tenderness. Rather than relying solely on cooking time estimates, always prioritize internal temperature monitoring to determine when your brisket has reached true doneness. A reliable thermometer is essential since visual cues alone can be misleading when determining true doneness. This disciplined approach guarantees tender, properly rendered results every time.

BBQ HI/LOW temp range alarm: Set your desired food temp and HI/LOW temp range for your grill or smoker to know when to add more fuel smoker thermometer will flash and beep to remind you if the temperature ever goes out your set range; HI/LOW temp range alarm is specifically designed for usage with smokers, grills and BBQs

Bluetooth Monitor Remotely: Govee Bluetooth meat thermometer lets you check the temperature of your grill, smoker, or oven from your phone. With this smart BBQ thermometer, you can multitask while grilling.

More Stable Than Bluetooth: Our advanced RF technology ensures a stronger, more reliable connection than Bluetooth. This smoker thermometer provides the freedom to move around without losing connection! Monitor your BBQ from up to 1,000 feet away!
Wrapping and Managing Moisture During Cooking
Wrapping your brisket at 155–170°F internal temperature is where you’ll push through the stall and transform your cook from good to exceptional. Ideal brisket wrapping using the Texas Crutch—double-layered heavy-duty foil with a tight seal—locks in juices while accelerating cooking. You’ll want to add ½ to ¾ cup of beef broth or tallow, maximizing wrapped moisture levels as fat and connective tissues break down.
Position your brisket fat-side down in the foil’s center, then fold everything tightly with the seam-side up to prevent leaks. This braising environment creates tenderness while maintaining juiciness through the critical stall phase. The sealed foil environment also helps protect lean flats from drying out during the extended cook. Different liquid options like dark ales or red wine can further enhance your flavor profile if you prefer alternatives to beef broth. Similar to smoking beef ribs, maintaining probe-tender texture requires careful monitoring of internal temperature throughout the cooking process. The brisket can experience a stall phase where the internal temperature plateaus due to evaporative cooling, which is why wrapping helps maintain cooking momentum. This wrapping technique speeds up cooking similar to how it reduces rib smoking time from over five hours to about three hours total. Just as with ribs that benefit from low temperature braising before finishing, the wrapped phase allows your brisket to develop maximum tenderness. Continue cooking until your probe slides through at 203–210°F, ensuring perfectly tender results every time. After unwrapping, let the brisket rest before slicing to allow juices to redistribute throughout the meat for maximum flavor and moisture.
Resting and Slicing Your Finished Brisket
When your probe slides through the point like butter at 195°F, you’re ready to shift from cooking to resting—a critical phase that’ll make or break your final product. Create an ideal resting environment by wrapping your brisket tightly in foil, then placing it in a Faux Cambro cooler lined with towels. This maintains heat while allowing juices to redistribute throughout the meat, preventing moisture loss during slicing. For even better results, place a scoop of tallow under the point to enhance flavor and moisture retention during the extended rest period.
Rest for 2-3 hours minimum. When you’re ready, employ ideal slicing techniques by separating the point and flat, then cutting against the grain with steady, confident strokes. Your probe should meet little resistance, confirming the brisket’s tenderness. Resting allows the internal pressure to lower, which helps retain the juices that would otherwise run out onto the cutting board when you slice into hot meat. Just as with grilled steaks, resting the meat after cooking is essential to lock in moisture and ensure every slice delivers maximum juiciness. Using a meat thermometer to monitor temperature throughout the cooking process ensures you achieve your desired level of doneness with precision. Before your next cook, maintain your grill grates by applying high-temperature cooking oils like vegetable or canola oil after each use to prevent rust and ensure optimal performance. These high-smoke-point oils resist burning at grilling temperatures and create a protective layer that keeps your grates in top condition. Consider placing a fire-resistant grill mat under your gas grill to protect your deck or patio from grease drips and heat damage while ensuring easy cleanup after long cooking sessions. These final steps transform your effort into perfectly moist, tender brisket worthy of your meticulous gas grill preparation.
Advanced Techniques for Maximum Tenderness
You’ll elevate your brisket from good to exceptional by mastering the interplay between temperature precision, strategic wrapping, and moisture control. Deploy internal temperature monitoring religiously—target 200–205°F for maximum tenderness while avoiding hood openings that sabotage heat recovery. Apply the Texas crutch after three hours to accelerate collagen breakdown through steam retention.
Optimize your smoke profile by deploying hickory or mesquite for the initial 1–2 hours before wrapping, building bark while preserving moisture. Position your point end toward heat flow for balanced penetration. Rotate your wrapped brisket every thirty minutes during the higher 300–325°F phase, ensuring uniform heat distribution. On a gas grill, use a water pan on the flavorizer bars to help maintain consistent low temperatures and prevent temperature spikes. For enhanced wood-smoked flavor without a built-in smoker box, add wet wood chips to a stainless steel smoker box accessory positioned near your burners. Installing adjustable heat tents beneath your cooking grates prevents flare-ups from dripping fat while maintaining even heat distribution throughout the extended cook time.
These synchronized techniques—precision timing, strategic wrapping sequencing, and smoke profile optimization—transform your gas grill into a precision tenderness machine, delivering competition-grade results consistently. Consider using cast iron grates if your gas grill allows upgrades, as they retain heat more effectively during long cooks and help maintain stable temperatures throughout the brisket’s extended smoking time. After your cook, clean the grill grates while warm to easily remove accumulated grease and brisket residue before they harden. Protect your investment with a waterproof grill cover designed for your burner configuration to shield against weather damage between cooking sessions.