You’ll achieve competition-grade results by selecting a thick ribeye or bone-in cut, then dry-brining it with kosher salt. Set your pellet grill to 250°F and smoke until the steak reaches 120-130°F internally—roughly 45 minutes to 1.5 hours depending on thickness. Finish with a high-heat sear at 450-500°F for 1-2 minutes per side to develop that caramelized crust. Rest for 5-10 minutes before slicing against the grain. The specific techniques that separate good steaks from exceptional ones require understanding each phase’s nuances.
Steak Selection
Since you’re working with a pellet grill’s unique low-and-slow capabilities, choosing the right cut makes all the difference. You’ll want steaks with marbling characteristics that enhance tenderness and flavor development during extended smoking. Ribeye stands out as your premier choice, offering high marbling that translates to juicy results at low temperatures.
For regional steak variety, consider bone-in options like porterhouse or T-bone, which deliver robust flavor profiles. If you’re budget-conscious, flat iron from the top blade provides extreme tenderness comparable to premium cuts. Top Sirloin Steak is another flavorful and versatile option that performs well on pellet grills. While propane grills like the Napoleon Prestige 500 offer high BTU output for quick searing, pellet grills excel at the low-temperature smoking that develops complex flavors in quality cuts. Pellet grills like the Traeger Ironwood 885 are particularly renowned for producing reverse-seared steaks with subtle smoke rings. Thicker steaks—ideally 12-16 ounces or larger—absorb smoke flavor more effectively than thin cuts. For optimal crust development, consider using cast-iron skillets or griddles to improve browning and grill marks on your steaks. Selecting high-quality, fresh steaks ensures you’re starting with the best foundation for exceptional results.
Avoid lean cuts like flank steak for smoking; reserve those for quick searing instead. Allowing your steaks to reach room temperature before grilling helps them cook evenly throughout. Using a meat thermometer to monitor your steak’s internal temperature ensures you achieve your desired doneness level. Your cut selection directly determines how successfully your pellet grill develops that signature smoky crust while maintaining juicy interiors.

This item is only available for delivery or pick-up between 9am and 10pm

One boneless beef ribeye steak weighing between 0.5 and 1.2 pounds

Bone In Ribeye My Two Favorite Things is funny phrase for men, women, grill masters, pitmasters, butchers, steak enthusiasts, meat lovers, barbecue fans. Perfect for cookouts, steak nights, backyard grilling, restaurants, and food events.
Preparation and Seasoning
Proper preparation separates a mediocre steak from an exceptional one, and you’ll want to start with dry brining—the foundation of flavor development on your pellet grill. Apply kosher salt at one teaspoon per pound, distributed evenly on both sides. Brine for one to twenty-four hours to augment tenderness and moisture retention.
Pat your steaks dry with paper towels, wiping away excess surface salt. This critical step guarantees seasonings adhere properly without steaming during cooking. For the best results, select bone-in ribeye steaks that are at least 1.25 inches thick with good marbling throughout. Using a meat thermometer during cooking will help you achieve the precise internal temperature needed for perfect results. Allowing your steak to rest after grilling helps redistribute juices throughout the meat for optimal tenderness and flavor.
For seasoning application methodology, press kosher salt, cracked black pepper, or beef rub firmly into the meat surface using the flat of your hand. Apply a thin layer of high smoke-point oil as a binder first. Starting with cold steaks ensures the meat attracts more smoke from your pellet grill for superior flavor development. Your tempering duration should be forty-five minutes to one hour before grilling, allowing steaks to reach room temperature for even cooking. The Maillard reaction during the initial sear phase creates the flavorful crust that distinguishes a perfectly grilled steak. For optimal results, finish your steak with a high-heat sear after smoking to develop a deeply caramelized exterior.

USDA Certified Organic Steak: Organic Rancher Beef Ribeye Steak (Boneless) comes from cattle raised on certified organic pastures with lifetime traceability. Free from antibiotics, added hormones, synthetic chemicals, and GMOs

One bone-in beef loin t-bone steak weighing between 0.7 and 2 pounds

ORGANIC, GRASS-FED, REGENERATIVE: Our ribeye steaks are USDA Organic, 100% grass-fed & finished, sourced from regenerative farms, verified by Land to Market,100% pasture-raised, free range, humanely raised with no feedlots EVER. Always fresh, never frozen. Non GMO and never contains antibiotics or added growth hormones. Always fresh, never frozen.
Pellet Grill Setup
How you set up your pellet grill determines whether you’ll achieve that perfect sear or struggle with temperature inconsistencies. Start by positioning your grill on level ground, maintaining at least 6 feet clearance from walls and structures. Connect to a 240V AC outlet and verify the three-flash power confirmation. Check your hopper capacity and fill it with premium pellets appropriate for your cooking duration. Kingsford™ Hardwood Pellets deliver excellent performance in all pellet grills and are recommended for optimal results. Calibrate your pellet sensor to guarantee overfilling issues do not occur. Inspect your fire pot adjustment mechanism to confirm direct flame capability—essential for high-heat searing between 450°F and 500°F. Different hardwood pellet flavors can enhance your cooking experience while maintaining consistent temperature control. Pellet grills require significantly less manual tending compared to charcoal or gas alternatives, allowing you to focus on perfecting your technique. For beginners setting up their first grill, models like the Traeger Grills Pro 22 offer user-friendly design with consistent temperature control to help you master your setup. Z Grills wood pellet smokers also maintain consistent temperatures even in cold weather, making them reliable for year-round cooking. WiFi-enabled grills like the Traeger Pro 575 allow you to monitor and adjust temperatures remotely through smartphone apps for added convenience. Run your seasoning cycle at 400°F for one hour to eliminate manufacturing residues. Before your first cooking session, run the burning procedure to ensure the pellets ignite properly and the grill reaches optimal operating temperature. These preparatory steps establish the foundation for consistent, restaurant-quality steak results.
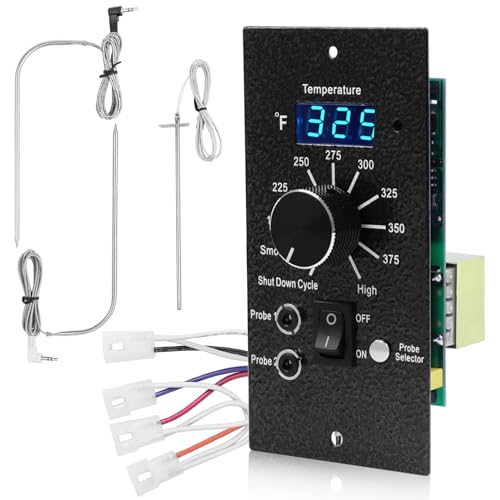
【COMPATIBILITY】: This Traeger Digital Controller kit replacement part compatible with most Traeger Wood Pellet Grills (except PTG), ideal replacement for Traeger Controller BAC365.

【Compatibility】The PID controller Panel is compatible with Traeger pellet grill models such as Traeger Pro 20, 22, & 34, Texas Elite 34, Lil Tex 22, JUNIOR ELITE 20, Ridgeland, Heartland, Mesa 22, Century 22/34, Silverton (2019), and Bronson 20 Except PTG. The upgraded digital Temperature controller ensures broader accessory compatibility and delivers more stable temperature control.

Replaces 3 speed smoker control, compatible with Traeger wood pellet grill models (except PTG)
Smoking Phase
With your pellet grill properly calibrated and seasoned, you’re ready to begin the smoking phase—the critical foundation for achieving a perfectly cooked steak. Set your temperature between 225-250°F, with 250°F serving as your standard baseline for most cuts. Your pellet selection directly influences smoke intensity control; signature blends deliver distinct flavor profiles throughout the extended cooking period. Monitor your steak’s internal temperature using a probe thermometer inserted into the thickest portion. For medium-rare, target 120-130°F before the searing phase. Expect 45 minutes to 1.5 hours depending on steak thickness and weight. Several factors affect cooking time on a pellet smoker, including the thickness of the meat, cooking temperature, type of meat, humidity, and altitude. Maintain consistent heat through proper oxygen flow and thermostat management, preventing temperature fluctuations that compromise your final result. Advanced PID temperature control systems can help maintain consistency throughout the cooking process. The digital controller monitors temperature sensors and regulates pellet feeding to ensure even heat distribution. Thicker steaks of 2 inches or more provide superior temperature control and allow the smoke to penetrate evenly throughout the meat. The stall phase may occur during smoking, requiring careful monitoring with a thermometer to push through the temperature plateau. Using a meat thermometer ensures you achieve your desired doneness level accurately. After smoking reaches your target temperature, carryover cooking will continue to raise the internal temperature slightly during the searing phase.
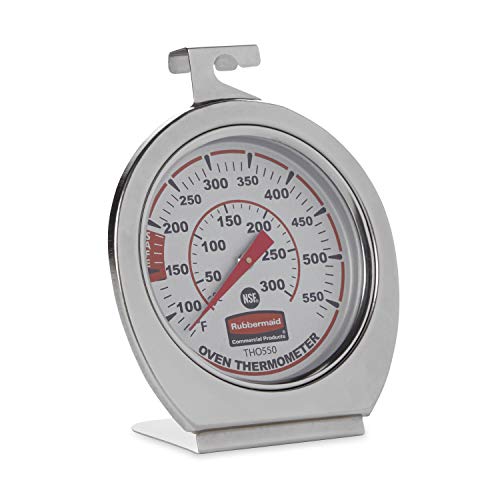
FOOD SAFETY: Thermometer displays true oven temperature instantly to ensure safe food preparation

【Easier to Use】Equipped with 2 meat probes, this BBQ thermometer for grill allows you to monitor separate meats or the grill temperature simultaneously, a real comfort in grilling several pork loins for large groups with different tastes

COMPATIBILITY: Meat probe is only compatible with Pit Boss wood pellet grills and smokers. NOTE: The probe NOT FIT FOR Treager, Camp Chef, Masterbuilt, Char-Grill, Therm Pro. Please ensure your grill and confirm that the model is compatible
Searing Phase
The sear’s your final step to developing that coveted crust, and it demands precision timing and temperature control. You’ll crank your pellet grill to maximum output, targeting the 550-800°F range where the Maillard reaction thrives. Pull your steak from the smoking phase when it reaches 110-120°F internal searing temperature—roughly 10°F below your target doneness.
Pat the meat dry, season it, and place it directly on the hottest grates. Sear 2-3 minutes per side without moving it; this restraint builds that deep brown exterior you’re after. Your total searing duration control should span 4-6 minutes. Flip once for even marks, monitoring color carefully to avoid burning. A deep brown color signals the perfect crust development without charring the surface. This searing approach maintains moisture and prevents the gray band of overcooked meat that can occur when cooking through on high heat alone. The intense radiant heat from the grill grates combined with direct contact creates the optimal conditions for developing that flavorful crust. For enhanced results on a pellet grill with temperature limitations, consider using a cast iron pan preheated on the grill to achieve the necessary conductive heat for optimal searing. Bringing your steak to room temperature before the searing phase ensures more even cooking throughout the meat. For steaks thicker than one inch, adjust your timing accordingly since internal temperature is the most reliable indicator for doneness. Using an instant-read thermometer to monitor your steak’s temperature close to the bone ensures you achieve your desired level of doneness. Use your thermometer to confirm final temperatures before plating.

VERSATILE COOKING PERFORMANCE: Ideal for stovetop, oven, grill, or open flame—perfect for searing, browning, baking, and more.

Steakhouse Sear At Home: The Lodge Square Cast Iron Grill Pan delivers high-heat searing and bold grill marks while channeling excess grease away

YOUR NEW GO-TO GRILLING PAN: The Lodge Cast Iron Grilling Pan is perfect for shrimp, veggies, fish, and more! The grid design protects food from falling through the grate and infuses your dish with that wonderful grill flavor. This lightweight grilling pan can handle the heat and the dual handle design makes it easy to maneuver as you cook.
Resting and Serving
Once you’ve pulled your steak from the heat and achieved that perfect crust, you’re not done—resting is where you’ll secure the juicy, tender results all your timing and temperature work demands. Transfer your steak to a cutting board immediately and loosely tent it with foil, preventing steam buildup while retaining warmth. Let it rest undisturbed for 5-10 minutes, allowing muscles to relax and redistribute juices evenly throughout the meat. This critical step directly impacts juice quality and flavor enhancement. During this resting period, carryover cooking continues to raise the internal temperature slightly, so plan accordingly if you’re targeting a specific doneness level. Research shows that steaks rested for longer periods, such as 15-20 minutes, demonstrate noticeably superior juiciness retention compared to those cut immediately. Just as with brisket, resting allows the meat to achieve optimal tenderness and moisture distribution before serving. A meat thermometer ensures you can accurately monitor the final internal temperature before slicing. Allowing juices to redistribute through proper resting, much like developing a flavorful crust, is essential for achieving restaurant-quality results. For any leftover steak, allow it to cool completely before tightly wrapping] to preserve quality if you plan to store it.
After resting, top your steak with a tablespoon of butter and slice against the grain for maximum tenderness. Serve immediately on a platter, pairing with your chosen sides. You’ll now experience the full smoky complexity your pellet grill developed, with every bite delivering consistent tenderness and succulence.