
You’ll achieve restaurant-quality results by mastering three essentials. First, bring your flat iron steak to room temperature and season generously with salt and pepper. Preheat your grill to 500°F, then sear undisturbed for 3–5 minutes per side, rotating 45 degrees halfway through for crosshatch marks. Use an instant-read thermometer to target 125–130°F for medium-rare. Rest your steak 5–10 minutes before slicing against the grain. The techniques behind each step reveal why timing and temperature control separate exceptional steaks from ordinary ones.
Preparation and Seasoning
Before you fire up the grill, you’ll want to remove your flat iron steak from the refrigerator and let it sit at room temperature for 30 to 60 minutes. This pivotal room temperature timing allows internal temperatures to equalize, ensuring even cooking throughout the meat. Cold steak placed directly on heat creates uneven doneness.
Next, season both sides generously with fine salt and black pepper immediately before cooking. Salt timing is paramount since it draws out moisture; applying it too early compromises texture. Apply approximately 1-2 tablespoons of vegetable oil to both sides using a light brush technique. This oil amount prevents sticking and promotes ideal browning. Consider complementary seasonings like garlic powder, onion powder, or rosemary to enhance flavor depth. Flat iron steak’s natural marbling ensures juiciness and tenderness, so these complementary seasonings will enhance rather than mask the meat’s inherent rich flavor. For best results, dry the meat with a clean paper towel before seasoning to remove any surface moisture that could interfere with browning. Finally, oil your grill grates using a brush or oiled paper towel for consistent heat distribution, and choose an oil with a high smoke point to ensure it withstands the intense heat without burning.

Graza Frizzle Oil Made from 100% Olives: A neutral-flavored, high heat cooking oil made from 100% peak harvest olives. With a smoke point of up to 490 degrees, Frizzle is your high-heat kitchen hero. 1 bottle/750ml.

Light Buttery Flavor That Elevates Every Meal: Algae Cooking Club Chef-Grade Algae Oil enhances every dish with subtle richness. Its neutral profile makes it ideal for searing, baking, and dressings, transforming everyday meals into gourmet experiences.

Grill Preparation and Temperature
How’ll you know when your grill’s truly ready? Verify your grate temperature using an instant-read thermometer, aiming for 500°F—the sweet spot for flat iron steaks. Visual cues like heat shimmer and smoke confirm adequate temperature, but thermometer inspection guarantees accuracy.
Before placing your steak, clean your grates thoroughly to remove debris and residue. Next, you’ll oil the grates using a paper towel dipped in oil and applied with tongs, creating even coverage that prevents adhesion and promotes clean release. For optimal results, consider that grilling is the ideal cooking method for flat iron steaks due to its ability to deliver the high, direct heat necessary for proper searing. The flat iron’s thin rectangular shape allows for efficient heat penetration and quick, even cooking across the entire surface. Quality gas grills like the Weber Genesis SX-335s provide the even heat distribution essential for consistent steak cooking. Models with stainless steel construction offer superior durability and heat retention for reliable outdoor cooking. When selecting your grill, prioritize units with high BTU output to ensure rapid temperature recovery between steaks.
Temperature consistency is non-negotiable. Maintain steady heat throughout cooking by monitoring your fuel source and adjusting grate position if necessary. Premium grills with built-in temperature probes help you track cooking progress without lifting the lid. After your steak reaches the desired doneness, allow it to rest for several minutes to redistribute juices throughout the meat. This direct heat method eliminates temperature fluctuations that cause uneven cooking, certifying your flat iron develops proper crust formation and internal doneness simultaneously.

Rutland High Temperature Silicone is a great solution to your sealant and adhesive needs

Quality Material: made of heavy cast iron,this cast iron grill grate is stronger than stainless steel or enamels, can withstand higher temperatures, and has a long service life; Its sturdy material can handle high temperatures without degrading, ensuring you get a reliable and efficient accessory for your barbecuing adventures

Reliable Quality: The round grill grate is made of heavy duty cast iron material, can withstand higher temperatures than normal grate, will not crack or break due to high temperature. Long lasting, strong and easy to clean, a must have grills replacement parts for your Weber gourmet BBO system.
Initial Searing and First Side
Your steak’s success hinges on proper preparation before it ever touches the grill. You’ll want to allow your flat iron steak adequate rest time at room temperature—ideally 15 to 60 minutes—which promotes even cooking and moisture retention throughout the meat.
Once your grill reaches smoking hot temperatures, place your steak directly on the oiled grates without moving it. Resist the temptation to flip; let it sear undisturbed for 3 to 5 minutes. After two minutes, rotate the steak 45 degrees to create crosshatch grill marks that signal proper crust development. Generously seasoning your steak with kosher salt, garlic powder, and onion powder before searing enhances the browning process and creates a flavorful crust. For optimal results, preheat your grill on high heat for 10 minutes to ensure the grates are hot enough for a proper sear. Keeping your grill tool set nearby makes it easy to handle the steak safely and maintain control throughout the searing process.
The steak will naturally release from the grates when it’s ready to turn. Check for a visible browned crust and grill marks before proceeding to the second side. The intense radiant heat from the hot charcoal embers works alongside the direct contact between the steak and grates to develop that perfect sear and create the browning you’re looking for. For the most accurate monitoring, consider using a wireless meat thermometer with app connectivity to track your internal temperature in real time during the searing phase. Using a meat thermometer during the searing phase ensures you’re tracking the internal temperature as it develops. Models like the Monument Grills Mesa 415BZ offer 304 stainless steel construction that delivers the even heating necessary for consistent searing across the entire cooking surface.

Set of four steak thermometers takes the guesswork out of grilling your meats to the desired cooking level
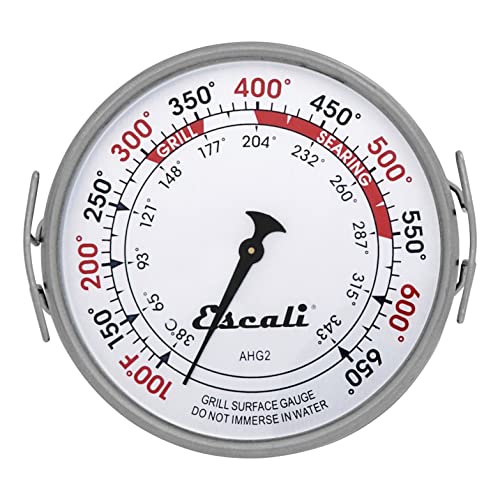
Temperature Range: 100° to 650°F / 38° to 343°C. Dial Diameter: 3.5 inches

TEMPERATURE GAUGE: Place directly on cooking surface for precise and easy use
Flipping and Second Side Cooking
Once the first side’s crust has set and you’ve achieved those coveted crosshatch marks, you’re ready for the flip. Use your steak flip finesse by gently lifting a corner with tongs to confirm the meat releases freely from the grill surface. Avoid forcing the flip, which risks tearing and compromises browning.
Execute a single, decisive flip using your second side technique. Immediately close the grill lid to maintain consistent temperature and retain heat and smoke. Cook for 3-4 minutes without disturbing the steak, then rotate 45 degrees and continue for another 3 minutes. Using tongs to flip rather than a fork prevents puncturing the meat and allows proper browning to develop. For optimal results, heat your grill to 450°F before placing the steak to ensure the grates are very hot and create that beautiful seared exterior. Proper preheating also reduces food safety risks by allowing the grill to reach safe cooking temperatures. Expert sources recommend grilling steaks at temperatures between 450°F and 500°F for superior sear and flavor development. Investing in a grill with even heat distribution across the cooking surface ensures consistent browning on both sides of your flat iron. Simply seasoning with salt and pepper allows the natural flavors of the meat to shine through.
Monitor the internal temperature closely as it rises during this phase. Your flat iron reaches perfect medium-rare when it develops an even golden-brown crust and releases naturally. Remember that carryover cooking will add approximately 5 degrees after removal. Allow the steak to rest for at least a few minutes after cooking so the juices can redistribute throughout the meat.
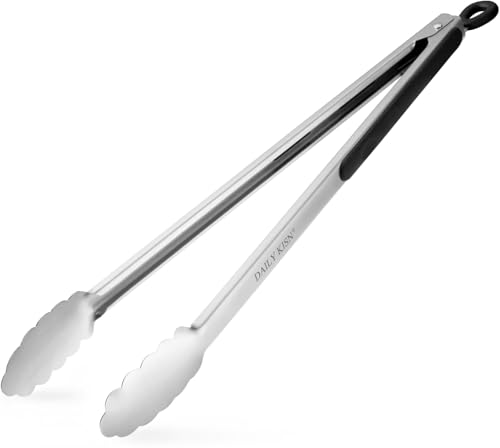
17" Extra Long Grill Tongs: These 17-inch Grill Tongs are essential for barbecuing, cooking, grilling, buffet serving, and camping. They are lengthy enough to protect your hands from heat, making it safer to handle hot food.

【Extra Long Tongs】 - EDDEAS 17 inch and 12 inch BBQ Grilling Tongs Protect your hands from the heat. Perfect for bbq, cooking, grilling, buffet serving, barbecue and camping etc.

【Your Second Pair of Hands】The kitchen tongs is an extension of a chef's hands. You can easy grab, flip, turn, and check cooking food with with these indispensable cooking tongs. This will prevent your hands from being burned by water vapor and oil. It is kitchen must haves for your kitchen
Temperature Monitoring and Doneness
When’s the ideal moment to check your flat iron’s doneness? You’ll want to monitor internal temperature during the final minutes of cooking. Use an instant-read thermometer like the Thermoworks MK4 Thermapen, inserting the probe into the steak’s thickest section for accuracy. For the best results with serious grilling, consider thermometers with ±0.5°F accuracy that deliver readings in just one second.
Pull your steak at 125°F for perfect medium-rare, accounting for carryover cooking. This thermal tolerance is critical—the internal temperature will rise 5-10°F during your 10-minute rest period, reaching your desired safe internal temperature of 130-140°F. Remove the steak early rather than jeopardize overcooking. Resting your steak after cooking allows juices to redistribute throughout the meat, ensuring maximum tenderness and flavor retention. The Maillard reaction that develops during the initial searing phase creates the flavorful crust that distinguishes a perfectly grilled steak.
For rare, pull at 115-120°F. Alternatively, you can use the finger test for doneness to determine cook time without relying solely on a thermometer. This precise approach guarantees consistent results, transforming guesswork into reliable technique every time you grill.

2.0 inches large auto-rotating backlit display: Digital food thermometer has a 180° auto-rotating backlit display, making this kitchen thermometer perfect for left-hand users and allows you to use it in low light conditions

【8X Faster + 4X More Precise】: Upgraded with an industrial-leading professional thermocouple sensor, Themomonster meat thermometer digital with NIST certified ±0.5℉ precision provides you the accurate temperature of your food in just 0.5 Seconds.

Instant Read Food Thermometer | Our instant read thermometer features a temperature probe and advanced, highly accurate technology with 1-2 seconds response time; Instructions, meat temperature chart, comes pre-calibrated for your convenience, and recalibrating feature if needed.
Resting and Serving
Now that you’ve nailed the internal temperature and pulled your flat iron from the heat at precisely 125°F, the real work begins. Loosely tent your steak with aluminum foil on a warm plate, allowing carryover heat retention to raise the internal temperature approximately 5 degrees Fahrenheit. For a 1 to 1.5-inch flat iron, rest for 8-10 minutes undisturbed—this critical pause permits muscle fibers to relax and redistribute fatty liquids throughout the meat. This even distribution of juices ensures every slice delivers consistent tenderness and flavor.
Once rested, carve against the grain using deliberate, controlled strokes to shorten muscle fibers and maximize tenderness. Transfer your sliced steak immediately to warm plates for balanced plate presentation. Just as higher heat tolerance prevents burning and ensures even browning in cooking techniques, proper resting prevents juices from escaping when you slice. Allowing your steak to rest on a warm plate maintains the crust development achieved during the searing process. Similar to how butter and mayonnaise create optimal browning and flavor in other dishes, finishing your steak with garlic-herb butter or a complementary sauce enhances both flavor and visual appeal while maintaining ideal temperature for an exceptional dining experience. A quick-read meat thermometer can help you verify that your steak has reached the ideal resting temperature before serving.
Tips for Grilling Success
Since proper preparation and technique form the foundation of a perfectly grilled flat iron steak, you’ll want to begin with salting—applying coarse salt to both sides and refrigerating exposed for one hour to overnight on a rack over a tray. Mastering the charcoal ignition process guarantees consistent high heat essential for developing a quality crust. Prioritize grill safety considerations by cleaning grates thoroughly and oiling them with a paper towel and tongs before cooking. Consider using a bristle-free grill brush to avoid stray wire bristles that could contaminate your food. Bristle-free brushes eliminate the ingestion hazards posed by traditional wire alternatives. Unlike traditional wire brushes, coiled designs such as Grillaholics offer sturdy construction and scrapers that tackle stubborn grime without leaving residues in food. When selecting a bristle-free option, look for features like replaceable heads and integrated scrapers that enhance both safety and cleaning performance. Maintain grill temperatures exceeding 500°F for ideal searing. Use an instant-read thermometer to verify internal temperatures reach 125-130°F for medium-rare doneness, accounting for carryover cooking‘s 5°F rise. Finally, slice your steak across the grain to maximize tenderness and flavor delivery. The second most tender steak after filet mignon, flat iron steaks deliver exceptional results when these preparation steps are followed precisely. Allow the steak to rest for approximately 10 minutes after removing it from the grill to maintain juiciness and flavor throughout.


